Difference between BMW ICOM NEXT and BMW ICOM A2

BMW ICOM NEXT and BMW ICOM A2 both can work with the same software ISTA-D ISTA-P for the same BMW vehicles. But they are kind of different from some aspects, especially firmware adaption. Such as :

(1) ICOM NEXT Functionally compatible to BMW ICOM A2
(2) ICOM NEXT Mechanical design similar ICOM A2 
(3) ICOM NEXT Backwards compatible to car adapters (BMW ICOM B, C) and motorcycle adapters (ICOM D, E)

(4) ICOM NEXT ABC SPECS:

  1. Zeroization of data on tamper detection
  2. Secure supply chain assurance
  3. Key storage using physically un-clonable function
  4. CRI Pass-Through DPA Patent Portfolio
  5. Advanced cryptographic Services

(5) Improved Functionality and Performance:

  1. Gbit workshop LAN,backwards compatible
  2. Preparation for Gbit LAN on vehicle OBD(cars do not yet supportthis and interface not yet defined,ICOM Next hardware adaptation will be necessary for future Gbit car interface,will cause adaptation costs)
  3. Faster start-up times and high throughput
  4. Through high-performance,low-power ARM SoC
  5. Improved handling
  6. More flexible OBD cable
  7. Lighted button for logs etc

Reference for ICOM Next restore:

1.It need usb 2.0 or usb 3.0 flash drive formatted with FAT32.

2.Copy ICOM_Next-rootfs-xxxxxx.tar.gz and ICON_Next-app-xxxxxx.tar.gz to the root of usb.

3.Please make sure BMW Icom have disconnected from power supply.

4.Plug USB drive into ICOM NEXT.

5.Press and hold the button on ICOM NEXT and connect it to the OBDII of a vehicle.

6.Keep the button pressed after about 4 second all LED turn to orange/yellow.

7.Release the button and then press it 3 times within 5 second.

8.Wait for around 5 until the led’s turns green.

https://www.autonumen.com/goods-6983-BMW-ICOM-NEXT-A-B-C-with-Software-Plus-EVG7-Tablet-PC.html


How to choose Gm Tech 2 scanner

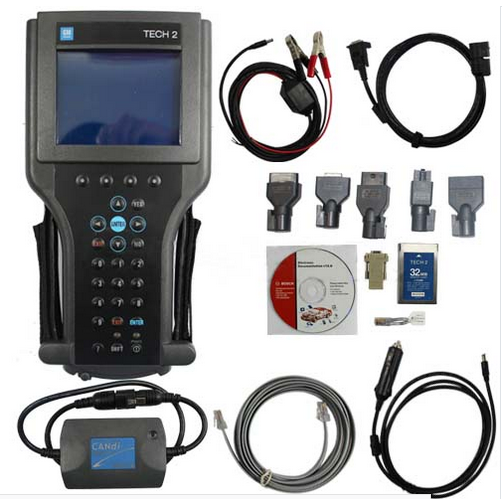
GM Tech II is a diagnostic machine invented by GM as the optimal tool using Vetronix 2 technology together with genuine software used to diagnose GM models from 1992 up to now. Gm tech 2 scanner can be used for the diagnostics of GM models Europe, North America and Asia, Suzuki, ISUZU, Opel, SAAB.

Diagnostic software and machines search fault codes for automobiles GM Tech 2 Vehicles Network Diagnostic method scan Diagnosis in vehicles Aftermarket automotive 12 thumbnail

That is the first of the multi-series to execute vehicle network infrastructure diagnostics utilizing scan-tool features. Mainly software-driven structures without moving pieces are vehicle networks. In addition to checking the integrity of the belt, the overwhelming number of smart transportation diagnostics depend on the scanning tools available.

Network diagnostics provide a wide range of techniques and knowledge needed for each protocol. In the following sequence, we would concentrate on some scan tool features on specific network protocols to inform the technical population about the testing functionality which may or may not be possible on their existing scan tool.

However, how to choose a scanner to suit your car is not easy. Here is GM Tech 2 scanner review for everything you have to read this piece, which gives you all the details required for this must – have item.

Consider When To Buy This Item

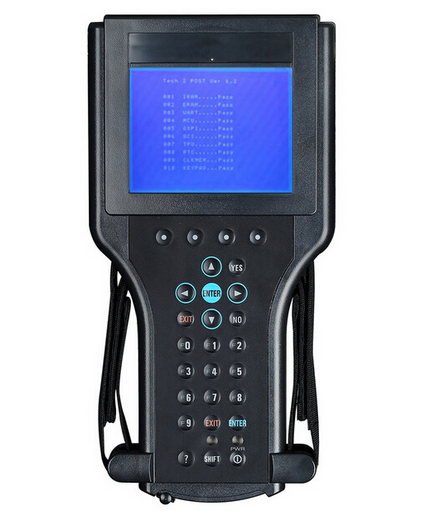
GM Tech 2 Tech 2 GM Scanner with CANDI TIS Works for GM/ SAAB/ OPEL/ SUZUKI/ ISUZU/ Holden

1.Multi-langauge: English, Italian, French, Portuguese, German, Spainish, Korean, Japanese, Thai, Chinese
2. Update: via 32MB Software Card, when there is newer version, you can just buy new card to update
3.Support Car Models: GM, SAAB, Opel, Suzuki, Isuzu, Holden

Connect ability

If you need to connect to other signal sources, you should consider the number of signal ports to be able to connect from multiple vehicles or sources at the same time, you should consider carefully.

Weight

The heavier the gm tech, the more expensive. If fixed in the car, weight of 9 pounds or more is not a problem. If you are on the go, you can choose a light machine less than 8 pounds.

Car devices will give priority to compactness and ease of installation. Products on the market are also designed in an increasingly streamlined way to save power and easily installed through the OBD port (car reading port).

This is also a factor you should consider to avoid choosing equipment that takes up a lot of space and requires a lot of installation.

Capacity

Buyers often think that a computer with a larger capacity will run smoothly, but the capacity is just enough for the need to process, usually most users do not need more than 32mb unless they need to copy data.

Select an affordable gm tech 2 

Currently, the types of scanner on the market have many different prices for many product lines. Therefore, you should consider referencing the detailed product models and choose the price that suits your needs when buying this device.

Normally, when buying a cheap scanner, the quality of the guitar will be equivalent to the price, easy to damage and the power source of the GM tech is not stable.

Choosing a reputable brand when buying gm tech 2 

A particularly important note is that you need to choose a reputable and quality brand to buy gm tech 2 scanner.

Equipment has warranty stamps and standard conformity certificates

One of the most important criteria that users must pay attention to when buying car accessories, especially navigation equipment, is warranty stamps and standard conformity certificates.

Specifically, standard-compliant positioning device means equipment conforming to “standards”, which may be issued by state agencies or organizations or by foreign manufacturers or organizations or a third party makes up.

Conformity means conforming to the “regulations” issued by the state, the certification of conformity and declaration of conformity is required if the equipment is covered by the Circulars or regulations. Ministry of functions issued.

Equipment has a long warranty period

Warranty commitment is a very important criterion when choosing to buy positioning: unfortunately when used, the product has malfunction or error, if the warranty expires early or the seller is not reputable, it does not support you anymore. will lose money with disability.

The positioning devices for cars are affixed with warranty stamps, on the stamps are marked with the warranty month and year boxes and marked in the box. The warranty period of the device is 6 – 12 months.

These are for reference only, if you want to learn more please click here:

https://www.autonumen.com/goods-1568-GM-Tech2-Scanner-for-GM-SAAB-OPEL-SUZUKI-ISUZU-Holden.html

How to install wiTECH MicroPod 2 v17.04.27 software

IMPORTANT: Once the Chrysler WiTech MicroPod 2 is configured using the VCI Setup Utility, all the VCI’s Wireless Settings will be deleted. You will be required to follow the instructions from the KB link titled Configure Wi-Fi on a VCI

To download the application, please login to DealerCONNECT > Service > wiTECH Information > VCI Setup Utility

Step 1

Begin the downloading process of VCI Setup Utility.

Step 2

The install wizard will appear and install the wiTECH Driver x64 onto your computer if wiTECH 1 is not installed on your PC.

If the PC has been installed with wiTECH 1.0 App, you will not see the screen below and proceed to Step 6 . Otherwise, click “Next” to proceed.

Step 3

Read the License Agreement carefully, and accept the terms in the license agreement. Then, click “Next” to continue.

Step 4

You are now ready to start the actual installation of the driver. You now need to click on “Install” for it to start.

Step 5

This will now install the wiTECH Driver x64. Once complete, the program will automatically proceed to the next step.

Step 6

Once the installation has completed, click “Finish”. Proceed to the following section, “Using the VCI Setup Utility”.

Using the VCI Setup Utility

NOTE: Please make sure that your computer is connected to the internet and the VCI is connected to the computer via USB before starting this process. This application will help you configure your VCI for wiTECH 2.0.

Step 1
Start VCI Setup Utility by clicking the icon on the desktop:

If the VCI Setup Utility that is installed is out of date, you will be forced to update to the newer version of the application.

Step 2

Please make sure your VCI is connected to the PC via USB.

Step 2a

If you see the following screen you may not be connected to the internet, or have a firewall that blocks 1 or more of these websites.

Select “ Continue ” on the next screen for wiTECH 2.0 Device Setup and Configuration.

NOTE: If you only want to configure the wireless setting on a VCI device to use with wiTECH 2.0, click “Wireless Configuration” and follow instructions.

Select “ Continue ” on the next screen to begin attempting to connect to the VCI device.

Step 3

Once your VCI is recognized by the utility, select “Continue” to proceed with the configuration.

NOTE: microPODs with a serial number beginning with “WFP” should NOT be used with this utility.

Step 3a

If the utility does not find the VCI device, please assure that the VCI is connected via USB and click “Refresh”.

Step 5

The following screen will appear for up to 15 minutes while the VCI device is being configured.

Step 6

The following screen will appear when the utility completed the configuration of VCI for wiTECH 2.0 Application.

Note: After VCI Setup Utility is ran, all existing wireless networks will be removed from the VCI.

Important! Leave the VCI Setup Utility window running as you will be required to complete software updates to the VCI device before configuring the wireless.

Step 6a

Login into wiTECH 2.0 with SID that has been assigned to the VCI at https://login.n.fcawitech.com . The VCI that was just configured using the VCI Setup Utility should appear in the wiTECH 2.0 discovery. You will need to update the operating system of your VCI before it can be used with wiTECH 2.0. Click “Continue”, and your web browser will redirect you to the page to download and install the operating system update as seen in the following step.

*NOTE: If VCI does not show up in discovery after a couple of minutes please power cycle your VCI by unplugging it and plugging it back in.

Step 7

Click “Update Now” and your VCI should continue to the update screen. Once updating, do not interrupt your VCI at any point until the update is complete.

*NOTE: This can take upwards of 9 minutes. It is normal activity for the VCI to reboot.

Step 8

Click “OK” and you will be navigated back to the wiTECH 2.0 discovery page. Your VCI should appear updated and ready for use.


DO NOT UNPLUG USB cable from the pod until the WiFi is configured successfully first.

Step 9

With the VCI Setup Utility still running, please follow the KB link listed below to configure wireless on the VCI device.

More information about car diagnostic tools, please visit https://www.autonumen.com