The latest version of Mercedes Xentry specialized diagnostic software 2023.09
Mercedes-Benz has always been at the forefront of automotive technology, constantly pushing boundaries and setting new standards. With the release of the latest version of their specialized diagnostic software, Xentry 2023.09, Mercedes once again proves its commitment to providing exceptional performance and unrivaled user experience. In this article, we delve into the exciting features and advancements that make Xentry 2023.09 a must-have for automotive professionals and enthusiasts alike.
Top Reasons to Get Super MB SD C6 DoIP:
1.The new SDconnect C6 is able to work for DoIP.
2.It’s the only C6 that supports ethernet communication (DoIP).
3.Have tested no issues on the new Mercedes with DoIP.
4.No need to worry about firmware damage during the update process
5.The wireless connection is stable. (With built-in Wifi Chip)
6.remote help is available.
7.Good Quality, It’s waterproof, shockproof, and tamper-proof.
8.With Free DTS Monaco & Vediamo
9.Support both 12V Cars and 24V Trucks.
10.not only supports K line diagnosis and CAN BUS, but also UDS diagnose protocol.
11.Connector adopt Military quick swap technology, it can support 10,000 times pull the plug, more stable;
12.All core accessories adopt the original new packing chip, and a 24hours test, guarantee the quality of the products.
Softwares list:
1. DAS 2023.09: the automatically Diagnosis Assistance System.Support 213/257 and so on new cars to register free to diagnosis
2. Xentry 2023.09: New software released by Bennz Company after 04/2009 by diagnosis new cars.
3.WIS net 2021.07:Workshop Information System
Supply the whole view of the wiring diagram in a car, component location diagram and maintenance method. What you do is to enter the chassis number, and then you will get the manufacture data, engine configuration and the car model -all in detail.
4. EPC.net 2018.11:Electronic Parts Catalog
5. ST Finder:Part Location Finder options: 2016 and 2020 and 2022
6. STARUTILITIES:the movement management system and self-test
7. SD MEDIA 2014
8. PL76 2022.01
9.HHT Software for old cars
10. Engineer version Vediamo updated to V5.01.01 ,Engineer version DTS updated to V9.02,Upgrade to the latest version of 2022 data
1) Fix the error that Mercedes-Benz DAS cannot directly call WIS
2) Join the DAS sedan smart offline programming
3) Join the 204 DAS stand-alone version, which can be mutated (German), which is more powerful than Vediamo
4) Join DAS special function password-free access PKW and SMART
5) Repair SMART 450, 451, 452, 454 No longer need TAN Caculator, all offline
6) Increase offline EOL and VMAX all LKW, modify truck maximum speed limit
7) Lift the truck NOx TORGUE restriction, do not need FDOK XT calculation code, directly enter, directly cancel the legal speed limit, you can modify without special function
8) Clear the truck SCR/ADBLUE fault code (MR), do not need FDOK XN calculation code, enter directly
9)Add DAS 212,207 prototyp model
If you own a New Holland CX5000, CX6000, or CX8000 agriculture machine, it’s crucial to stay updated with the latest service information. This blog post will guide you through the adblue inline filter upgrade process, ensuring that your machine operates smoothly and efficiently. We will discuss the affected models, the importance of the upgrade, and provide step-by-step instructions for the installation.
Affected Models:
The adblue inline filter upgrade is applicable to the following New Holland models:
– CX8.90, CX7080 Elevation, CX7090 Elevation, CX8070 Elevation, CX8080 Elevation, CX8090 Elevation, CX8040, CX8050, CX8070, CX8080, CX8090, CR7.90, CR8.80, CR8.90, CR9.80, CR9.90, CR6090, CR7090, CR8070, CR8080, CR8090, CR9070, CR9080, CR9090, CX508 Elevation, CX5090 E, CX5090 Hillside, CX5090 Laterale, CX5080, CX5090, CX5090 Hillside, CX5090 Laterale, CX6080 Elevation, CX6090 Elevation, CX6090 Laterale, CX6080, CX6090, CX6090 Laterale.
The Need for Upgrade:
The previous AdBlue filtration system in these models was prone to blockages resulting in low pressure in the AdBlue system. This low pressure could trigger error codes, such as E-0907-07, SCR007, 1757-03, and E-1916-07, leading to potential engine de-rate mode. To resolve these concerns, New Holland introduced upgrades to enhance the filtration system and prevent blockages.
Upgrade Process:
To overcome the issues mentioned above, New Holland introduced the following updates:
1. Installation of a filter on the vent line of the AdBlue tank: Previously, the vent line was open to the atmosphere, allowing enter theBlue system. The new filter will prevent debris from entering the system through the vent line.
2. Introduction of a larger in-line filter on the suction line between the AdBlue tank and the Dosing Control Unit (DCU): This new filter has a longer service interval and improves filtration efficiency.
For service:
To overcome any service concerns NEW HOLLAND introduced the below updates for use on Tier4A combines:
A filter with associated hardware for the vent line of the AdBlue tank.
A service kit 48041490 to retrofit the larger in-line filter onto Tier4A combines.
SERVICE
Unit preparation
NOTE: The four reference points to the unit are the left-hand side, the right-hand side, the front of the unit, and the back of the unit. These reference points apply to someone that faces the direction of travel from a standing position that is behind the unit.
WARNING
Avoid injury!
Before you start any work on the unit, prepare the unit according to the following instructions.
Failure to comply could result in death or serious injury.
W1403B
Thoroughly clean the area on the unit that pertains to the service instructions for this Service Bulletin.
Park the unit on a hard, level surface.
Apply the parking brake.
Completely lower any attachments to the ground.
Relieve all of the hydraulic system pressure.
Shut down the engine.
Remove the ignition key.
Follow any specific instructions that pertain to the unit within the service instructions as necessary.
Service instruction
NOTE: If a combine has debris in the AdBlue system NEW HOLLAND recommends that you remove the AdBlue tank and flush it out completely with warm water.
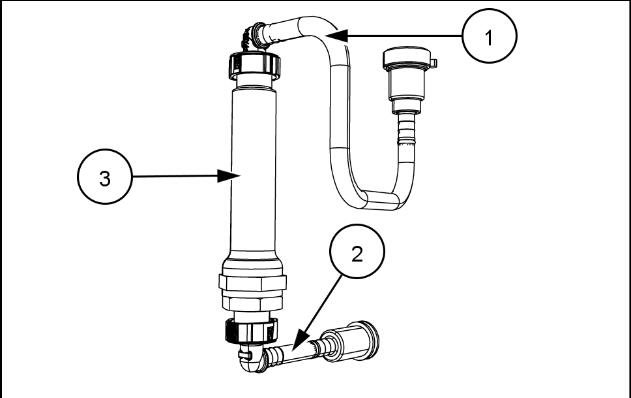
To install the larger in-line filter on the suction line between the AdBlue tank and the DCU:
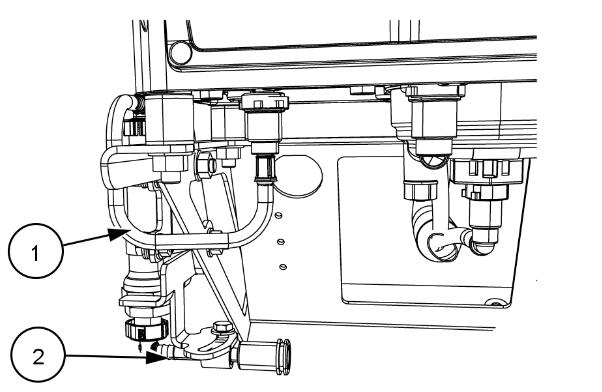
1.Install the hoses (1) and (2) onto the in-line filter (3).
2.Use the two ‘P’ clips (4) to install the filter assembly onto the bracket (5).
3.Use the ‘P’ clip (6) to secure the hose (2) onto the bracket (5).
NOTE: Install the ‘P’ clips onto the bracket with the hardware:M6x16 bolt, M6 Nut and two M6 Belleville washers.
NOTE: For CX6090 combines, install the M6 bolts opposite to the direction that Figure 2 depicts. This action will avoid interference between the bolt and the DCU frame.
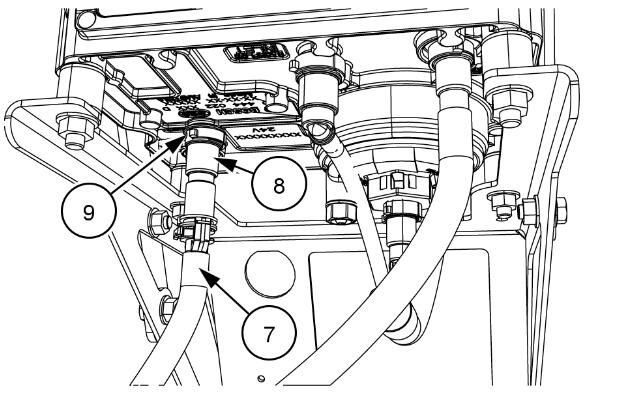
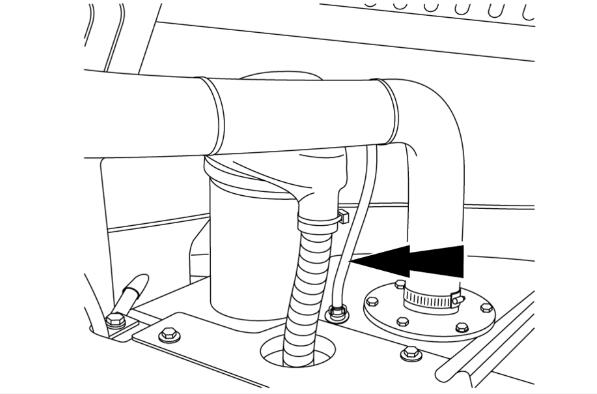
4.Disconnect the hose (7) from the existing in-line filter (8).
5.Disconnect the existing in-line filter (8) from the bottom of the DCU (9).
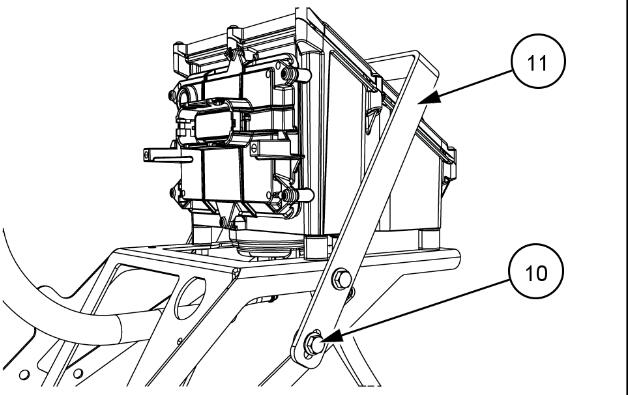
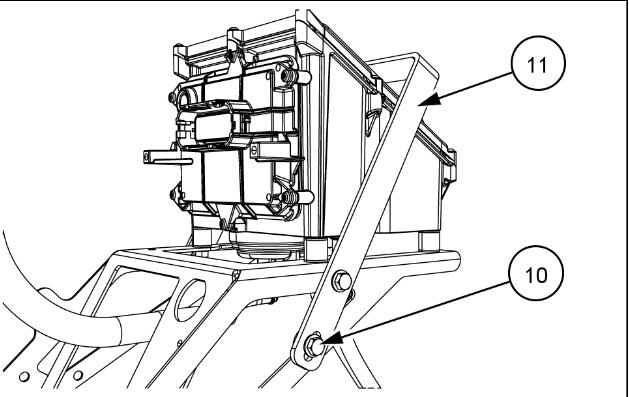
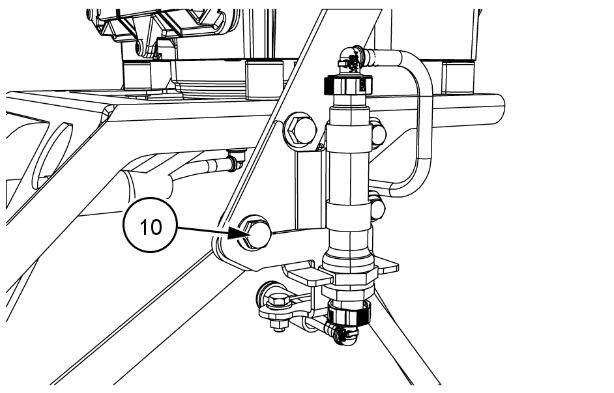
6.Remove the bolt (10) from the safety bracket (11) on the DCU support.
7.Remove the bolt (10) from the safety bracket (11) on the DCU support.
8.Use the bolt (10) to install the new filter assembly onto the DCU support, as Figure 5 depicts.
NOTE: Use the hardware: M8x25 bolt with M8 nut and two Belleville washers.
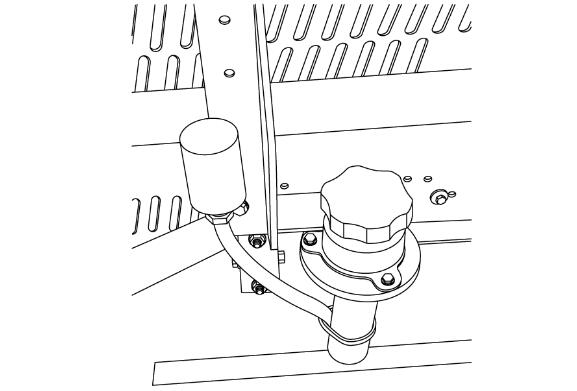
NOTE: CX6090 has a slightly different bracket for mounting the new filter assembly, as Figure 6 depicts.
9.Connect hose (1) to the suction inlet of the DCU.
10.Connect hose (2) to the existing suction hose from the AdBlue tank. See Figure 3 (7).
To install the filter on the vent line of the AdBlue tank on CR series Tier 4A combines:
1.Cut the existing vent line 50 – 100 mm (2 – 4 in) from where it is connected to the AdBlue tank, as Figure 8 depicts.
2.Slide one end of the new larger diameter hose over the existing vent line.
3.Secure the larger diameter hose with a hose clamp.
4.Slide the hose clamp onto the other end of the larger diameter hose.
5.Install the filter onto the open end of the hose.
6.Use an M8 bolt with a spacer and an M8 nut to attach the filter retaining clamp somewhere on the engine deck.
NOTE: You MUST mount the filter above the height of the filler neck, as Figure 9 depicts.
To install the filter on the vent line of the AdBlue tank on CX series Tier 4A combines:
1.Cut the existing vent line 50 – 100 mm (2 – 4 in) from where it is connected to the AdBlue tank, as Figure 8 depicts.
2.Slide one end of the new larger diameter hose over the existing vent line.
3.Secure the larger diameter hose with a hose clamp.
4.Cut the hose to the correct length so that you can install the filter with a Zip tie just above the filler neck.
NOTE: Use the existing Zip tie base that fixed the old vent line.
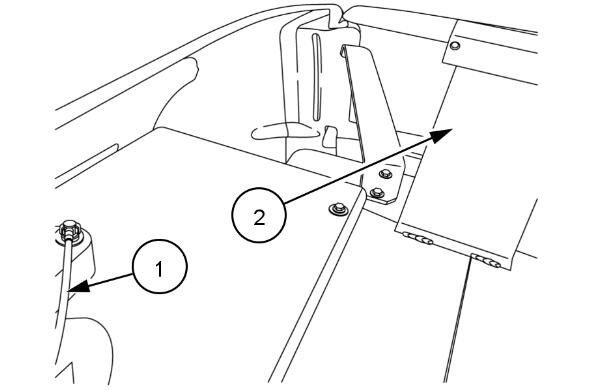
To install the filter on the vent line of the AdBlue tank on CX 5000 series Tier 4A combines and CX 6000 series Tier 4A combines:
1.Cut the existing vent line 50 – 100 mm (2 – 4 in) from where it is connected to the AdBlue tank (1) , as Figure 10 depicts.
2.Slide one end of the new larger diameter hose over the existing vent line.
3.Secure the larger diameter hose with a hose clamp.
4.Slide the hose clamp onto the other end of the larger diameter hose.
5.Install the filter onto the open end of the hose.
6.Use an M8 bolt with a spacer and an M8 nut to attach the filter retaining clamp somewhere on the engine deck.
NOTE: You MUST mount the filter above the height of the filler neck, as Figure 10 depicts.
NOTE: To mount the filter you must drill a 9 mm hole (2) in the rear shield support on the straw hood.
By following the above upgrade guide, you can ensure that your New Holland CX5000, CX6000, or CX8000 agriculture machine is equipped with an improved adblue inline filter system. This upgrade will prevent block, reduce error codes, and enhance the overall performance of your machine. Don’t overlook the importance of regular maintenance and upgrades to maximize your productivity in the field.
Note: For more repair cases and troubleshooting related to New Holland machines, refer to our comprehensive guide on New Holland Trouble Repair.