How to uninstall NEXIQ USB-Link

Are you in need of uninstalling NEXIQ USB-Link to fix some problems? Are you looking for an effective solution to completely uninstall it and thoroughly delete all of its files out of your PC? No worry! This page provides detailed instructions on how to completely uninstall NEXIQ USB-Link.

Possible problems when you uninstall Nexiq USB Link
* NEXIQ USB-Link is not listed in Programs and Features.
* You do not have sufficient access to uninstall NEXIQ USB-Link.
* A file required for this uninstallation to complete could not be run.
* An error has occurred. Not all of the files were successfully uninstalled.
* Another process that is using the file stops NEXIQ USB-Link being uninstalled.
* Files and folders of NEXIQ USB-Link can be found in the hard disk after the uninstallation.
NEXIQ USB-Link cannot be uninstalled due to many other problems. An incomplete uninstallation of NEXIQ USB-Link may also cause many problems. So, it’s really important to completely uninstall NEXIQ USB-Link and remove all of its files.

How to Uninstall NEXIQ USB-Link Completley?
Recommended Method: Quick Way to Uninstall NEXIQ USB-Link
Method 1: Uninstall NEXIQ USB-Link via Programs and Features.
Method 2: Uninstall NEXIQ USB-Link with its uninstaller.exe.
Method 3: Uninstall NEXIQ USB-Link via System Restore.
Method 4: Uninstall NEXIQ USB-Link with Antivirus.
Method 5: Reinstall NEXIQ USB-Link to uninstall.
Method 6: Use the Uninstall Command Displayed in the Registry.
Method 7: Uninstall NEXIQ USB-Link with Third-party Uninstaller.
Method 1: Uninstall NEXIQ USB-Link via Programs and Features.
When a new piece of program is installed on your system, that program is added to the list in Programs and Features. When you want to uninstall the program, you can go to the Programs and Features to uninstall it. So when you want to uninstall NEXIQ USB-Link, the first solution is to uninstall it via Programs and Features.

Steps:

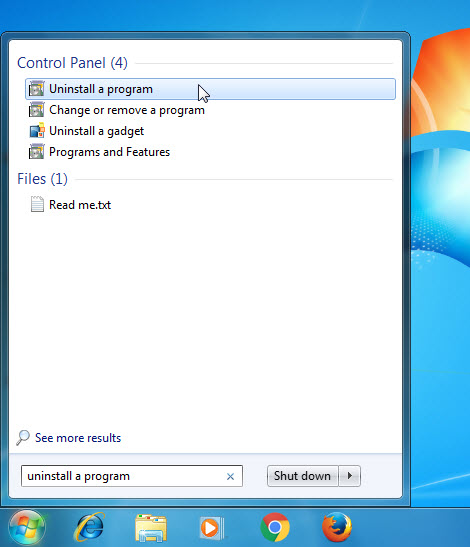
a. Open Programs and Features.
Windows Vista and Windows 7

Click Start, type uninstall a program in the Search programs and files box and then click the result.

How-to-uninstall-NEXIQ-USB-Link-1

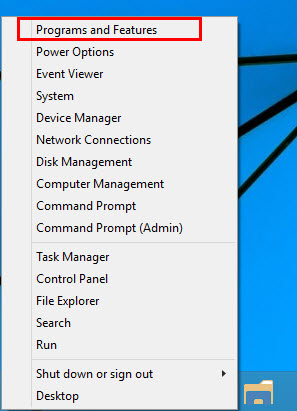
Windows 8, Windows 8.1 and Windows 10

Open WinX menu by holding Windows and X keys together, and then click Programs and Features.

How-to-uninstall-NEXIQ-USB-Link-2

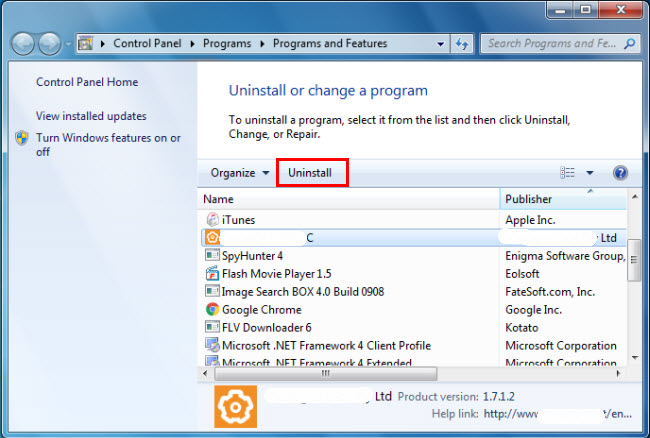
b. Look for NEXIQ USB-Link in the list, click on it and then click Uninstall to initiate the uninstallation.

How-to-uninstall-NEXIQ-USB-Link-3

Method 2: Uninstall NEXIQ USB-Link with its uninstaller.exe.
Most of computer programs have an executable file named uninst000.exe or uninstall.exe or something along these lines. You can find this files in the installation folder of NEXIQ USB-Link.

Steps:

a. Go to the installation folder of NEXIQ USB-Link.
b. Find uninstall.exe or unins000.exe.

How-to-uninstall-NEXIQ-USB-Link-4

c. Double click on its uninstaller and follow the wizard to uninstall NEXIQ USB-Link.
Method 3: Uninstall NEXIQ USB-Link via System Restore.
System Restore is a utility which comes with Windows operating systems and helps computer users restore the system to a previous state and remove programs interfering with the operation of the computer. If you have created a system restore point prior to installing a program, then you can use System Restore to restore your system and completely eradicate the unwanted programs like NEXIQ USB-Link. You should backup your personal files and data before doing a System Restore.

Steps:

a. Close all files and programs that are open.
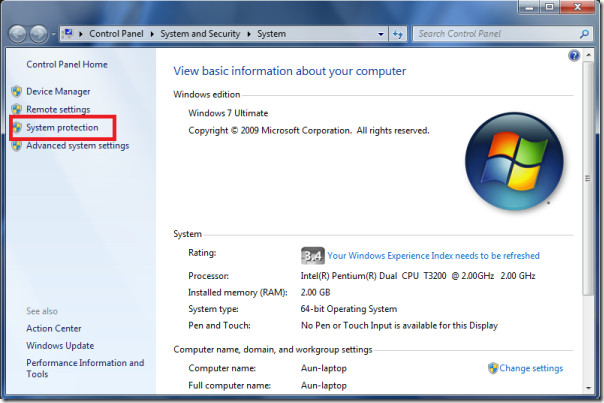
b. On the desktop, right click Computer and select Properties. The system window will display.
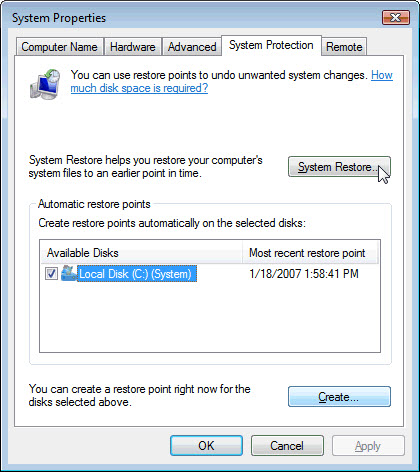
c. On the left side of the System window, click System protection. The System Properties window will display.

How-to-uninstall-NEXIQ-USB-Link-5

d. Click System Restore and the System Restore window will display.

How-to-uninstall-NEXIQ-USB-Link-5 How-to-uninstall-NEXIQ-USB-Link-6

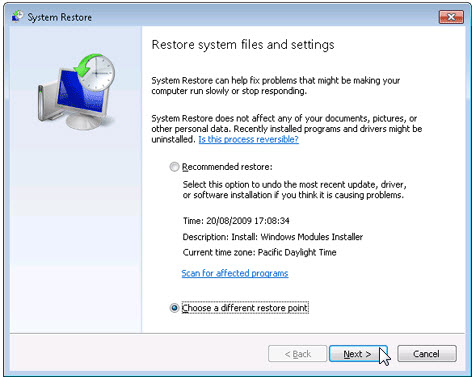
e. Select Choose a different restore point and click Next.

How-to-uninstall-NEXIQ-USB-Link-7

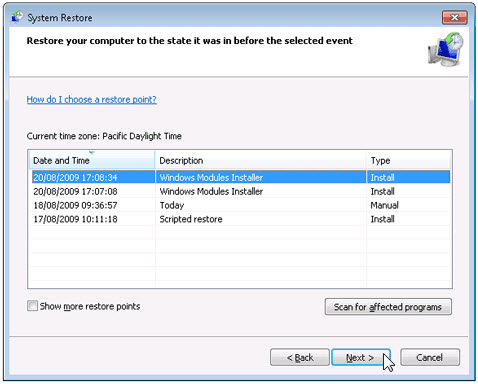
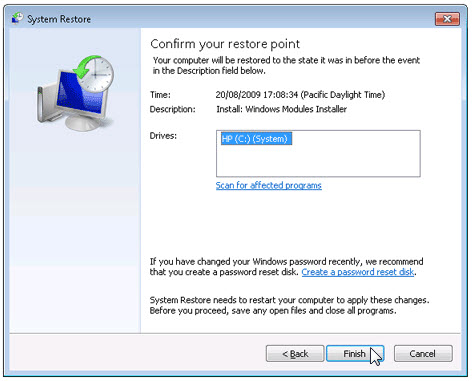
f. Select a date and time from the list and then click Next. You should know that all programs and drivers installed after the selected date and time may not work properly and may need to be re-installed.

How-to-uninstall-NEXIQ-USB-Link-8

g. Click Finish when the “Confirm your restore point” window appears.

How-to-uninstall-NEXIQ-USB-Link-9

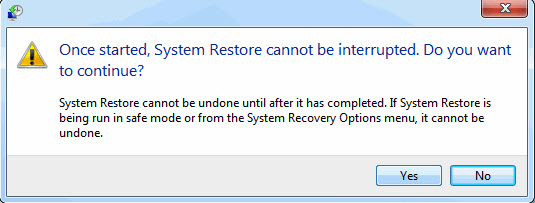
h. Click Yes to confirm again.

How-to-uninstall-NEXIQ-USB-Link-10

Method 4: Uninstall NEXIQ USB-Link with Antivirus.
Nowadays, computer malware appear like common computer applications but they are much more difficult to remove from the computer. Such malware get into the computer with the help of Trojans and spyware. Other computer malware like adware programs or potentially unwanted programs are also very difficult to remove. They usually get installed on your system by bundling with freeware software like video recording, games or PDF convertors. They can easily bypass the detection of the antivirus programs on your system. If you cannot remove NEXIQ USB-Link like other programs, then it’s worth checking whether it’s a malware or not. Click and download this malware detect tool for a free scan.

Method 5: Reinstall NEXIQ USB-Link to Uninstall.
When the file required to uninstall NEXIQ USB-Link is corrupted or missing, it will not be able to uninstall the program. In such circumstance, reinstalling NEXIQ USB-Link may do the trick. Run the installer either in the original disk or the download file to reinstall the program again. Sometimes, the installer may allow you to repair or uninstall the program as well.

Method 6: Use the Uninstall Command Displayed in the Registry.
When a program is installed on the computer, Windows will save its settings and information in the registry, including the uninstall command to uninstall the program. You can try this method to uninstall NEXIQ USB-Link. Please carefully edit the registry, because any mistake there may make your system crash.

Steps:

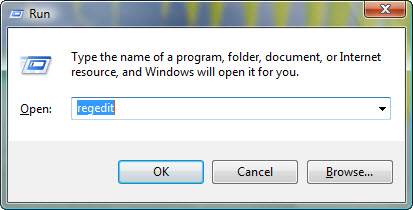
a. Hold Windows and R keys to open the Run command, type in regedit in the box and click OK.

How-to-uninstall-NEXIQ-USB-Link-11

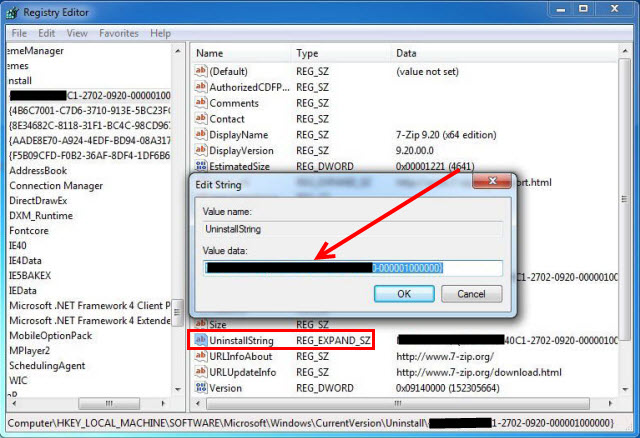
b. Navigate the following registry key and find the one of NEXIQ USB-Link:
HKEY_LOCAL_MACHINE\SOFTWARE\Microsoft\Windows\CurrentVersion\Uninstall

c. Double click on the UninstallString value, and copy its Value Data.

How-to-uninstall-NEXIQ-USB-Link-12

d. Hold Windows and R keys to open the Run command, paste the Value Data in the box and click OK.
e. Follow the wizard to uninstall NEXIQ USB-Link.
Method 7: Uninstall NEXIQ USB-Link with Third-party Uninstaller.
The manual uninstallation of NEXIQ USB-Link requires computer know-how and patience to accomplish. And no one can promise the manual uninstallation will completely uninstall NEXIQ USB-Link and remove all of its files. And an incomplete uninstallation will many useless and invalid items in the registry and affect your computer performance in a bad way. Too many useless files also occupy the free space of your hard disk and slow down your PC speed. So, it’s recommended that you uninstall NEXIQ USB-Link with a trusted third-party uninstaller which can scan your system, identify all files of NEXIQ USB-Link and completely remove them. Download this powerful third-party uninstaller below.

What Is PDR Top 9 Frequently Asked Questions

What is PDR?  It is short for Paintless Dent Repair and is a dent removal process that does not harm the factory paint.  It is most widely used for car hail damage but is also used to fix dents and dings in general.  The biggest benefit of PDR over other methods is that the vehicle remains 100% original, including the paint.

Now that you know what PDR is, here is a list of 9 common FAQ’s to help you decide if it is right for you.

What is PDR?
How does PDR work?
Is PDR safe?
How long does PDR take?
How much does PDR cost?
Will the dents return?
What can’t be fixed with PDR?
Is PDR covered under my insurance?
Is PDR Eco friendly?

1. What is PDR?

PDR is short for Paintless Dent Repair.  It is a method of dent removal that does not harm the factory paint during the process, as we mentioned earlier.  It is believed to have been invented around the 1960’s as an alternative to traditional body shop methods that require panel replacement, body fillers, and re-painting of the damaged area.

2. How does PDR work?

A PDR technician uses specialized tools to gently maneuver a dent back to its original position.  Modern vehicles have access spaces behind the body panels that the technician can use to reach most dents.  This requires skill and precision from the technician.  Sometimes, interior panels will be removed to reach certain dents, such as a door ding. PDR tools are specifically designed to reach difficult places and are heavy-duty enough to move metal.  From there, the dent is slowly pushed out.  Special lights let the technician know when the dent is perfectly positioned.  When the dent cannot be pushed out, it has to be pulled or lifted out.  For these types of dents, a PDR glue gun is used to pull it out.  If it does not line up exactly as intended, the technician will continue maneuvering it with hand tools until it does.

3. Is PDR safe?

PDR is the safest way to fix a dent in almost all cases since it is non-invasive unlike the other methods of repair.  A body shop may have to use fillers and aftermarket body panels to fix a dent before painting the affected area.  With PDR, your factory paint is not harmed and the vehicle stays 100% original.  PDR retains the full value of the vehicle as it looks as good as it did before the damage took place.  This is the reason car dealerships use PDR on their vehicles for anything from a minor dent to hail damage.

4. How long does PDR take?

PDR can take anywhere from an hour for a small dent or ding to several days for a full auto hail repair.  Each dent is individually removed so the time it takes to repair one depends on 2 primary factors:
Size:

For smaller dents and door dings, it can take an hour or two for the repair.  Our Express Service can repair most dents in a day and sometimes while you wait.  Larger dents take longer because there is more metal to push out.  If the dent is large and damages a body line, it can take several hours.  Collision PDR can take a day or two.  For car hail damage, it can take several days to a week to repair.  It all depends on the extent of the damage.
Location:

The location of the dent has a lot to do with how long PDR will take to fix it.  If the dent is easy to access from behind, the metal then it may take an hour or so.  This is most common in hood dents and shopping cart dings.  If the dent is on the roof of the vehicle or the door, it takes longer.  In those situations, the removal of interior parts may be necessary for the technician to reach the dent.

In either case, PDR is the fastest way to fix a dent.  It doesn’t require filling, sanding, or paint as other methods require.  The technician can start working on the vehicle immediately.

5. How much does PDR cost?

WOYO PDR007:397USD https://www.obd2tool.com/goods-10078-WOYO-PDR007-Auto-Body-Repair-PDR-Tools.html
WOYO PDR009:579USD https://www.obd2tool.com/goods-10200-WOYO-PDR009-Auto-Body-Repair-Tool.html

6. Will the dents return?

No.  Once PDR is performed, the dents will not return or “Pop out” again.  It is a permanent dent fix.  A dent causes the metal to stretch and causes it to stress.  Leaving it in this state can cause further damage to the metal and paint.  When a dent is repaired with PDR, the metal is gently maneuvered back into place.  This alleviates the stress and flattens the metal back to its original state.  Since the metal is returned to the original condition, there is nothing to pop back out.

7. What can’t be fixed with PDR

PDR is the best way to fix dents but it does have some limitations.  The biggest limitation is if the paint is chipped, cracked, or otherwise damaged in any way then it can not be repaired by PDR.  Another scenario would be a deep crease or the metal is so badly damaged that it make more sense to replace the panel.  All in all, most are pleasantly surprised about what PDR can fix.

8. Is PDR covered under my insurance?

Yes!  PDR is covered with full-coverage insurance.  In many cases, there is no reason to involve them as small dent removal typically costs less than a deductible.

9. Is PDR Eco Friendly?

Yes!  PDR is much more Eco friendly compared to other methods of dent repair.  Since paint is not required, there are no fumes or harsh chemicals used.  Other than the electricity in the building to run the lights and maybe a radio, there is little energy required with PDR.  It is about as Eco friendly as you can get.

Can any kind of pit be repaired WOYO PDR007

WOYO PDR007 is a high-precision equipment, due to regional differences in parameter format, may not be applicable in some areas, please know before buying. Use this equipment only in accordance with local laws.

Can-any-kind-of-pit-be-repaired-WOYO-PDR007

Can any kind of pit be repaired? How big a depression can be made?
Answer: The repair instrument is mainly aimed at some round and gentle depressions. The repair range is regardless of the area. Depends on the depth of the depression (also known as the damage of the iron plate) directly affects the feasibility of repair:
1. If the area of the depression is large? It is a rounded depression with a slow shape, the iron plate is not stretched too much, this type can be repaired,
2. The ribs and folds are not applicable (if the stretch is too large, it needs to be repaired with other tools)
3. If the depression area is small? However, the center is sharper and sharper, and this type of depression cannot be repaired;
(The repairable range is larger than the diameter of a coin of 2.4 yuan)
4. Can the aluminum body be repaired? Non-elastic metal material for aluminum body, not applicable.

Autel MaxiSys Elite Write VIN and Change Mileage on 2011 Dodge Journey

Buddy I’m gonna share with you my mobile technician wanted to install a used PC OEM module, so I’m going to show you how to write a VIN and also do mileage correction with the Autel MaxiSys Elite on a 2011 Dodge Journey (You also can do this procedure with the MS906BT and MS908SP and MK908P). I also talk about the differences in coding and programming. And I also share with you where to source your PCM.

autel-maxisys-elite-write-vin-and-change-mileage-01 (2)

Now what you’re gonna learn today:

1st.where to source your PC OEM module

2nd. How to make sure you selected the right used bcm module

3rd.The difference between coding and programming, people are still getting this messed up, I’m gonna clarify how to force right, a vin number and lastly how to adjust the mileage.

Alright, what we’re gonna be using today is a Autel Maxisys Elite tablet along with a used PC OEM module.

so as you can see here we’ve got a beautiful piece.

autel-maxisys-elite-write-vin-and-change-mileage-02 (2)

And I have a framework that I follow to decipher where I source the PC,  alright so my very first option is the dealer, now some of you guys might not agree with this being the first option but the reason why I liked it there because you’re buying certainty, okay I want to get the job done in and out. I wanna know that my client is going to be well off after I fix his vehicle okay, so that’s why I buy from a dealer now, sometimes they offer remanufactured PCM which are a little bit cheaper and they still work really really good, now the downfall of the d’s are there’s three downfalls sometimes if it’s an older vehicle they might not stock that part anymore, okay, the other thing is depending on the making model that PCM could be quite expensive;Third when you buy a new one that needs to be programmed and some people don’t know how to do that or they don’t have the right tools, so if you know you can’t do any of those options then I’ll go to option number two which is buying a used module from a salvage yard, now I find that as long as you get the right match, these should work with no problem, as long as you do your diligence on it to see if everything is fine I don’t have any issues with these then my last result would be the aftermarket, so a lot of my clients, they will actually skip the use a step and go straight the aftermarket and the reason why I don’t like them that much is because they give me the most headaches, they sell it with something wrong with it and remember guys when you’re trying to do a key learning procedure.

That PC model needs to be cleaned there can’t be any error codes in there otherwise you won’t be able to really learn the key okay, so when you’re selecting your PCM, it’s not good just to go buy vin number OK what you need to do is also identify the part number because if you just give someone the vin number and I’ve even seen dealers do this when you give them a vin number the the hardware that they give you they might have a different hardware level than your car so it’s not going to be working properly alright, so make sure you get the vin number and the module part number, now the ways you can get the part number is purchased, I like to purchase a day subscription. Through the manufacture and under their parts menu, they have all the part numbers there okay and then that way you can cross-reference with whatever.

autel-maxisys-elite-write-vin-and-change-mileage-03 (2)

autel-maxisys-elite-write-vin-and-change-mileage-04 (2)

autel-maxisys-elite-write-vin-and-change-mileage-05 (2)

Another free option is if you go to any odium on line parts supplier you type in the vin number on their website, go to the control modules and you’ll see the vin numbers there as well.

autel-maxisys-elite-write-vin-and-change-mileage-06 (2)

Alright now let’s jump into the demo now before I do I want to just take a quick poll how many of you guys think this is a programming event alright, how many think it’s a coding event, alright don’t cheat because I know when you guys are cheating so let me clarify programming is when you have a blank module, and you need to inject software from the manufacturer’s website, so that’s where you buy the subscription, you download it to your laptop uses a box to then programming; coding is when you.

You have like a used module like an art case.

And what we’re going to be doing is since it already has an operating system on it, we just need to configure it, we need to really learn and adapt it although there are under the coating umbrella.

autel-maxisys-elite-write-vin-and-change-mileage-07 (2)

So to be clear we’re doing a coding procedure today, alright now to:

Remove the battery disconnect and isolate the negative battery cable.
2.Unlock and disconnect the two electrical connectors at the PCM (2).

Remove the 4 bolts(3) holding the PCM(2) to the bracket, remove the PCM(2) from the vehicle.
autel-maxisys-elite-write-vin-and-change-mileage-08 (2)

Alright, so now that I’m into the Autel MaxiSys Elite tablet, the very first thing that I love to do is just do a diagnostic scan and I do this for several reasons:

1.It just gives me an idea of the overall health of the vehicle;

2.If we try to write the event and something goes wrong I can always go click the data lodging option, send that to my engineers and they can tell me a curt something’s up with this module or there’s something wrong with our software will give you a patch to fix it, so I always like to do that.

autel-maxisys-elite-write-vin-and-change-mileage-09 (2)

autel-maxisys-elite-write-vin-and-change-mileage-10 (2)

autel-maxisys-elite-write-vin-and-change-mileage-11 (2)

So we’re gonna do now is I’m going to do a quick erase just to see what we’re working with and then from there I’m gonna go into the [engine control module] to start writing power control module, so we’re gonna go there and click that button and see what we got alright, so from here we’ll look under the [special functions[ you see right at the bottom.

autel-maxisys-elite-write-vin-and-change-mileage-12 (2)

autel-maxisys-elite-write-vin-and-change-mileage-13 (2)

And we’re going to look for the [set vin] button which is on the bottom right hand corner, that’s not the right thing, so what we’re gonna do is run to fix it,we put in a correct vin number, all you do is press OK, and you just get a confirmation you’re gonna click yes then you’re done.

autel-maxisys-elite-write-vin-and-change-mileage-14 (2)

autel-maxisys-elite-write-vin-and-change-mileage-15 (2)

autel-maxisys-elite-write-vin-and-change-mileage-16 (2)

autel-maxisys-elite-write-vin-and-change-mileage-17 (2)

autel-maxisys-elite-write-vin-and-change-mileage-18 (2)

Now since this was a used module, it has the mileage from the other vehicle so we got to get it to reflect what’s on the vehicle now so that’s what we’re gonna do on this one is we’re going to [write the vin].

autel-maxisys-elite-write-vin-and-change-mileage-19 (2)

This function will write the current mileage into a new PCM.

autel-maxisys-elite-write-vin-and-change-mileage-20 (2)

Since we’re in the us where to go by a mile so we’re gonna click number one [Miles].

autel-maxisys-elite-write-vin-and-change-mileage-21 (2)

We’re going to click [NO] and skip forward no and we press OK, and here we’re going to put in their correct vin number.

autel-maxisys-elite-write-vin-and-change-mileage-22 (2)

autel-maxisys-elite-write-vin-and-change-mileage-23 (2)

autel-maxisys-elite-write-vin-and-change-mileage-24 (2)

Alright that’s it, you guys what I want you to remember:

vin writing and mileage correction are vehicle specific okay, so for those of you trying to do your research I don’t want you to read this article and be like oh it until there’s been writing it does but it’s not like something extremely strong especially on the mileage correction. Sometimes I have to use the J2534 before and do methods to write them in other times I have to use third party software to write the vin and even mileage correction that’s a whole Another industry, so it’s been specific and that’s why I’m saying it’s good to just know before you go, find out before you go if the tool has that capability for that vin number.
Make sure you match the PCM by the correct year make and part number.
don’t just do it by the vent, because you might have a different hardwar.

3.If it’s a brand new module, it requires a programming procedure with the J2534 and OEM subscription. If it’s a used module, this requires coding and configuration procedure that can be done with the Autel Maxisys Elite.

Scorpio-LK Tango free download and installation on Win 7/8/10

Hi guys, this article will show you where to download Scorpio-LK Tango 1.116 software and how to install the software on win 7 810.

Scorpio-LK Tango free download:

Browse http://www.scorpio-lk.com/eng/tango_downloads.html

scorpio-lk-tango-free-download-installation-00 (2)

Click on “Install 1.116.rar”

Click on “Ok” to download.

Scorpio-LK Tango installation guide:

1.Download the software files on your desktop.

2.Double click on the Tango Software installation file (.exe).

3.Select language and click on “Ok“.

scorpio-lk-tango-installation-update-01 (2)

4.Click on “Next“.

5.It’s recommended to leave the installation path as it is and click “Next“.

scorpio-lk-tango-installation-update-02 (2)

6.You can change the name of the shortcut in your start menu. Click “Next“.

7.Check the checkbox Create a desktop icon for easier access and click “Next“.

scorpio-lk-tango-installation-update-03 (2)

8.Wait for the installation.

scorpio-lk-tango-installation-update-04 (2)

9.Deselect “Launch Tango“ and click on “Finish“.

scorpio-lk-tango-installation-update-05 (2)

10.Go to the folder, where you just installed your Tango Software.(Default : My Computer > Local Disc(C:) > Program Files (x86) > Tango Scorpio-LK).

11.Open the “Driver“ folder.

scorpio-lk-tango-installation-update-06 (2)

12.Choose your operation system type and open the folder.

13.Right click on the “ftdibus“ and choose Install.

14.Click on “Ok“ to finish the driver installation.

15.Go to your desktop and right click on the Tango software’s shortcut.

16.Choose “Run as administrator“.

17.When the Software starts click on “Update“ on the “On-Line Update“ window to update your Tango Software.

scorpio-lk-tango-installation-update-07 (2)

scorpio-lk-tango-installation-update-08 (2)

18.Click on “Ok” and wait for the update to complete.

19.Your Tango programmer is now ready for work!