C'era una volta...Tutte le cose che amo come il cucito, ricamo, country painting... |
IL MIO SITO....
 Da poco è on-line il mio sito.. nuovo nuovo.. c'è ancora qualche aggiustino da fare, foto da inserire.. ma passate spesso perché sarà sempre più ricco!!!
Date un'occhiatina su www.merceriaceraunavolta.com 
Spesso cerco di proporre novità o fare sconti e promozioni... le trovate in questa colonna... perciò, ogni tanto scorrete fino in fondo 
MULIN� DMC 60CENT

b5200, ecru, 738, 666, 321, 353
352, 818, 800, 826, 798, 472, 471, 470,
727, 726, 725, 740, 437, 435, 433
938, 318, 310
La DMC ha deciso di fare una produzione
limitata di muliné
a 60centesimi per matassina.
In ogni matassina ci sono 4metri di filato,
quindi meno della solita,
è proprio l'ideale per chi usa molti
colori in uno stesso ricamo
ma non vuole avere spreco di filo e soldi
o per chi è alle prime armi e giustamente vuole
spendere il meno possibile.
SECRET PERFUME
Li adoro, assolutament fantasticosi!!!!!!!!!!!  E che prufumi gente!!!!!!!!!!!
Le fragranze sono:
- Tutti Frutti : mela verde, fragola, arancia, limone
- Bouquet di fiori: lavanda, mughetto, rosa, caprifoglio
- Dolcezze: cioccolato, vaniglia, caramello, mandorla
La DMC dice che resistono a 20 lavaggi a 40°. E' che a me sembra un delitto usarli per i soliti strofinacci o a sciugamani... io ci farò dei ricamini su pochette, o quadretti...
Il prezzo è di soli euro 1.95

SUPER OFFERTONA!!!!!!! PANNELLO A 8EURO!!!
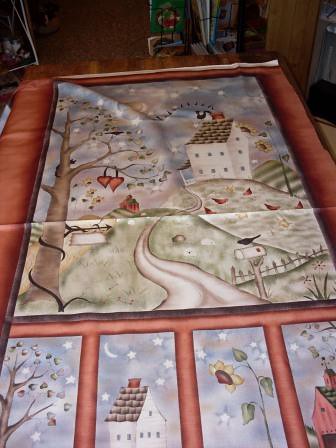
Questo è uno dei due pannelli
che stò svendendo a 8euro l'uno.
Non perdete l'occasione.
Per maggiori info scrivete a
andreoliclaudia@hotmail.it
TECNICA PEYOTE.
http://www.youtube.com/watch?v=VqgfLFRxmCU
Nel video trovate la prima parte della lavorazione, nel link la seconda!!! Buon divertimento
IL MIO NEGOZIO!!!
Il 20 dicembre 2006 ho finalmente realizzato il mio sogno!�Il mio piccolo negozio ha visto la luce... c'� di tutto dentro da tessuti americani, a idee per il ricamo, lana, cotone, progetti per il country e decorative painting, d�coupage, elementi per i bijoux.. e tanto altro. Pi� il tempo passa�e pi� mi rendo conto che il negozio mi somiglia, � proprio il mio piccolo mondo. L'ho chiamato 'C'era una volta...' in ricordo delle fiabe, perch� quelle pi� belle iniziano cos�. Se a qualcuno venisse voglia di passare a salutarmi l'indirizzo � via De Gasperi, 9 Albar� di Costermano -vr-
Visualizzazione ingrandita della mappa
MENU
| « AMICHE CREATIVE. Vi pres... | E' arrivato il filato P... » |
Zigzag Denim Exercise Mat & Duffle Bag
 By Holly Daniels
If you're looking for a way to use up lots of scraps, this is the project for you. Maybe seeing bits of some of your favorite fabrics will inspire you to exercise more often.
Project Notes
Two denim skirts and three pairs of jeans plus other cotton print scraps were combined to create this exercise set. Exercise might help you lose weight and make scraps from the jeans you are now wearing to create future denim scrap projects.
Project Specifications
Skill Level: Intermediate Exercise Mat Size: 28" x 56"
Duffel Size: Approximately 8 1/2" x 25 1/2"
Block Size: 7" x 7"
Number of Blocks: 32
Materials
- Variety of print scraps to total 1 1/2 yards
- Denim scraps to total 2 yards
- 1 yard lining fabric
- 1 yard muslin
- Backing 32" x 60"
- Batting 32" x 60"
- 2 pieces each thin batting 10" x 10" and 15" x 26"
- 5 1/4 yards self-made or purchased binding
- Neutral color and white all-purpose thread
- Gold cotton thread
- 26"-long white sport zipper
- 60" piece 1"-wide white nylon webbing
- Basic sewing supplies and tools
- Patterns
Exercise Mat
Step 1. Cut scraps into 3"-long by varying widths rectangles.
Step 2. Cut 32 muslin rectangles 3" x 11".
Step 3. Using the flip-and-sew method,
cover each muslin piece with 3" scrap rectangles as
shown in Figure 1.
 |  |
Step 4. Prepare template for piece A using
pattern piece given.
Trim ends of stitched 3" x 11" segments using
A as shown in Figure 2.
Step 5. Cut 32 squares 6 1/8" x 6 1/8" from denim scraps.
Cut each square in half on one diagonal to make B triangles.
Note: If denim scraps are too small to cut squares,
prepare template for piece B; cut 64 B pieces from denim scraps.
Step 6. Sew a B triangle to each long side of a pieced A as
shown in Figure 3; press seams open to reduce bulk.
Repeat for 32 blocks.
Step 7. Arrange blocks in eight rows of four blocks each
referring to the Placement Diagram for positioning of blocks.
Join blocks in rows; join rows to complete mat top.
Press seams open to reduce bulk.

Step 8. Prepare for quilting and finish using your favorite method. Note: The quilt shown was machine-quilted using gold cotton thread in the top of the machine and all-purpose thread in the bobbin. The quilting is 1/4" from seams of all pieces as shown in Figure 4.

Duffel Bag
 Step 1. To make pockets, cut two rectangles muslin 3" x 7". Cut scrap fabrics and stitch to muslin rectangles as in Steps 1 and 3 for Exercise Mat.
Step 2. Cut two pieces denim 3 1/2" x 7". Sew a piece to one 7" side of each strip-pieced section to make pocket fronts as shown in Figure 5; press seams open.
Step 3. Cut two pieces lining fabric 6" x 7". Layer one with each pocket with wrong sides together; baste around edges.
Step 4. Cut two pieces of denim 1 1/4" x 7". Fold under one long edge 1/4" on each piece; press. Pin remaining 7" raw edges of each piece to the strip-pieced 7" edge of layered pockets with right sides together; stitch. Turn denim strips to the lining side of the pockets; hand- or machine-stitch in place. Set aside.
Step 5. Cut two pieces lining 15" x 26".
Place one piece of lining right side down on a flat surface;
place 15" x 26" piece thin batting on top.
Cut pieces of denim scraps at least 15 1/2" long.
Sew denim pieces to lining/batting foundation using
flip-and-sew method to make bag side. Repeat for
second lining and batting pieces. Trim excess even
with lining piece.
Step 6. Topstitch 1/4" on each side of seams using
gold cotton thread in the top of the machine
and all-purpose thread in the bobbin.
Step 7. Center one pocket on one stitched bag
side as shown in Figure 6.
 |  |
Step 8. Cut two 30" pieces of 1"-wide white
nylon webbing. Pin one piece of webbing to
bag side covering raw edges of
pocket as shown in Figure 7. Stitch in place using
white all-purpose thread, again referring to Figure 7.
Repeat for second bag side.
Step 9. Cut two strips denim scrap 4" x 26".
Pin one strip 3" from bottom of bag side along raw
edge of pocket with right sides together as shown in
Figure 8; stitch. Repeat for second bag side.
 |  |
Step 10. Flip strips down to cover bottom; trim seam
even with bottom edge of bag sides.
Step 11. Align white sport zipper edge with top edge
of bag side with right sides together as shown in Figure 9.
Sew close to zipper teeth using white all-purpose thread.
Repeat on opposite side; press seams away from zipper.
Topstitch 1/4" from fabric edge as shown in Figure 10.
Note: If seam is too bulky, trim and finish zipper seam
allowances with a zigzag stitch or overlock stitch.
 |  |
Step 12. Overlap loose ends of zipper; tack in place
by hand as shown in Figure 11.
Step 13. Fold bag with right sides together;
sew bottom seams using a 1/2" seam allowance.
Step 14. Cut two 10" x 10" squares muslin.
Place a 10" x 10" piece thin batting on each piece.
Using the flip-and-sew method, stitch print scraps
to cover layered pieces. Trim to make a 9" circle from
each square using circle pattern given.
Step 15. Sew a circle to each end of the bag to finish.
Note: Zigzag stitch or overlock stitched seams to
prevent fraying, if desired.

Copyright © 2000 Quick & Easy Scrap Quilting in Mix and Match Sets, House of White Birches. All rights reserved.
INFO
CONTATTA L'AUTORE
|
Nickname: Claudy
|
|
|
|
Et�: 44 Prov: VR |
I MIEI BLOG AMICI
- Colorimmagini
- drops of.. Mara
- Libera di creare
- PATCHWORK.. di Laura
- Thirty Something di Andrea
- il diario che non cè
- rieccomi
- scrapmania
- ....Temptations....
- il baule dei sogni
- *Hobby*Grafica*
- Nuvole di pezza
- MAMMA E NON SOLO
- Meneraccontiunaltra
- ARTEKYARA
- LaNinfaMaia
- TANTO PER SAPERLO
- Le mani in Pasta
- voglio volare....
- SILVY
- manuxxxep
- Lachouette
- LA RETE X CHIARA
- IO AIUTO CHIARA
SITI E BLOG AMICI
- debbie mum.. patchwork per eccellenza
- L'hotel più speciale....
- biglietti giapponesi
- puntocroce
- il tempo ritrovato di federica
- nuvole rosa di Sabrina
- Il blog di bettin
- Selena e le sue creazioni
- Solo crocette di Rosa
- Luijo.. il suo blog Tilda
- Nuvole e farfalle di Francip
- Milena, fantasie e ricordi
- rosa e crocette di elena
- Marzia e i suoi giochi di colore
- Marta emozioni in patchwork
- Maria Rita e le sue roombox
- Il blog di Lisa
- Stefania... le mie crocette
- I ricami di Elisabetta Penny
- Patrizia, luce polverosa
- Gloria .. like a little pink pebble
- Marina, profumo di iris
- Il blog di M.Rita.. dire, fare, baciare....
- Antonella e Anna Maria, quattro manii creative
- Michele's blog
- Lucia, lo scrigno di luci
- Simonetta, country desires
- Brunella, il rifugio delle fate
- Linda con pane, amore e creatività
- Chiara, la soffitta di swamy
- Annamaria cuori e perline
- Sabrina recuperando
- Elena: fiori, fili e fantasia
- Country Laura
ULTIMI COMMENTI
Inviato da: minarossi82
il 11/11/2016 alle 18:07
Inviato da: paperinopa_1974
il 08/03/2016 alle 19:34
Inviato da: paperinopa_1974
il 15/02/2015 alle 11:00
Inviato da: paperinopa_1974
il 19/10/2014 alle 13:43
Inviato da: silvia
il 14/08/2014 alle 12:19
ULTIME VISITE AL BLOG
MMMHHH CHE BONT�!!
E' innegabile, adoro le ricette che presenta
di Benedetta Parodi.. quelle più veloci
ovviamente 
Ultimamente la torta di cioccolato e ricotta
è diventato il mio cavallo di battaglia,
quella cosa che in mezzora fai quando
sta per arrivare un ospite inaspettato.
Sarà che adoro la ricotta e in casa non
mi manca quasi mai, e sarà che fatalità nel
mio frigo non c'è quasi mai burro ma insomma
per questa torta ho sempre tutti gli ingradienti.
Ve la passo così potete sprimentarla
ingredienti:
300g di ricotta
200g di zucchero (vien bene anche col fruttosio)
3 uova
200g di farina
1 bustina di lievito
2 cucchiai di cacao amaro (anche 3 )
150g di gocce di cioccolato (io ci butto dentro anche altra cioccolata)
Amalgamare la ricotta con lo zucchero, aggiungere
le uova. Aggiungere la farina con il lievito, mescolare
bene e aggiungere il cacao amaro e le gocce.
Rivestire una teglia con la carta forno, versare il composto
e cuocere per 30 min a 180°.
Se non la mangiate a colazione, potete
servirla con del cioccolato fuso o panna.. o tutte e 2!!!!
TAG
TAG CLOUD
CERCA IN QUESTO BLOG

tema: estate
1) la base deve essere
azzurra... (qualsiasi tipo
di blu o azzurro...)
2) ci devono essere
particolari bianchi
3) un solo piccolo
particolare rosso...
spedizione: 12-15 giugno
SARAH KAY
 Sarah Kay lives in Australia.
