C'era una volta...Tutte le cose che amo come il cucito, ricamo, country painting... |
IL MIO SITO....
 Da poco è on-line il mio sito.. nuovo nuovo.. c'è ancora qualche aggiustino da fare, foto da inserire.. ma passate spesso perché sarà sempre più ricco!!!
Date un'occhiatina su www.merceriaceraunavolta.com 
Spesso cerco di proporre novità o fare sconti e promozioni... le trovate in questa colonna... perciò, ogni tanto scorrete fino in fondo 
MULIN� DMC 60CENT

b5200, ecru, 738, 666, 321, 353
352, 818, 800, 826, 798, 472, 471, 470,
727, 726, 725, 740, 437, 435, 433
938, 318, 310
La DMC ha deciso di fare una produzione
limitata di muliné
a 60centesimi per matassina.
In ogni matassina ci sono 4metri di filato,
quindi meno della solita,
è proprio l'ideale per chi usa molti
colori in uno stesso ricamo
ma non vuole avere spreco di filo e soldi
o per chi è alle prime armi e giustamente vuole
spendere il meno possibile.
SECRET PERFUME
Li adoro, assolutament fantasticosi!!!!!!!!!!!  E che prufumi gente!!!!!!!!!!!
Le fragranze sono:
- Tutti Frutti : mela verde, fragola, arancia, limone
- Bouquet di fiori: lavanda, mughetto, rosa, caprifoglio
- Dolcezze: cioccolato, vaniglia, caramello, mandorla
La DMC dice che resistono a 20 lavaggi a 40°. E' che a me sembra un delitto usarli per i soliti strofinacci o a sciugamani... io ci farò dei ricamini su pochette, o quadretti...
Il prezzo è di soli euro 1.95

SUPER OFFERTONA!!!!!!! PANNELLO A 8EURO!!!
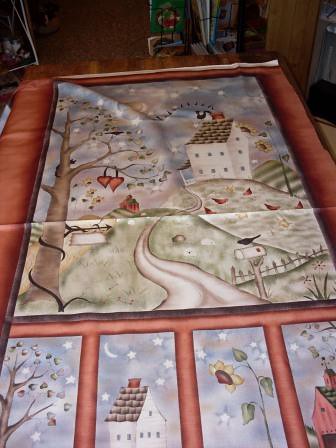
Questo è uno dei due pannelli
che stò svendendo a 8euro l'uno.
Non perdete l'occasione.
Per maggiori info scrivete a
andreoliclaudia@hotmail.it
TECNICA PEYOTE.
http://www.youtube.com/watch?v=VqgfLFRxmCU
Nel video trovate la prima parte della lavorazione, nel link la seconda!!! Buon divertimento
IL MIO NEGOZIO!!!
Il 20 dicembre 2006 ho finalmente realizzato il mio sogno!�Il mio piccolo negozio ha visto la luce... c'� di tutto dentro da tessuti americani, a idee per il ricamo, lana, cotone, progetti per il country e decorative painting, d�coupage, elementi per i bijoux.. e tanto altro. Pi� il tempo passa�e pi� mi rendo conto che il negozio mi somiglia, � proprio il mio piccolo mondo. L'ho chiamato 'C'era una volta...' in ricordo delle fiabe, perch� quelle pi� belle iniziano cos�. Se a qualcuno venisse voglia di passare a salutarmi l'indirizzo � via De Gasperi, 9 Albar� di Costermano -vr-
Visualizzazione ingrandita della mappa
MENU
| « Pannello 'casa dolce casa' | Per la festa della mamma!! » |
Gratis gratis gratis!!!Double Wedding Ring
Wedding season has started. A handmade quilt is a thoughtful gift a newlywed couple would be sure to treasure for many years. Many people start quilting when friends or family are getting married. The Double Wedding Ring is a classic design that is sure to be a welcomed gift. While this quilt pattern is traditionally made with scraps and a white background, the colors can easily be adapted to match the couple's wedding colors. For an interesting twist on tradition, make the background a darker color with lighter "rings." From the collection of Sandra L. Hatch The melon shapes create large circles of color and give this wonderful old quilt from the 1930s a soft, appealing look. Project Note Project Specifications Skill Level: Experienced Materials
Click here for templates and quilting diagrams. Instructions Step 1. Prepare templates using pattern pieces given;
Step 6. Sew the Four-Patch/A unit to the remaining side of the A-B unit to complete one horizontal pink/purple melon unit as shown in Figure 5. Repeat to make 24 horizontal melon units and 25 vertical melon units, again referring to Figure 5 for placement of A unit colors and positioning of Four-Patch units.
Step 8. Arrange four horizontal melon units in a row referring to Figure 8 for color placement; repeat for six melon rows.
| ||||||||||


INFO
CONTATTA L'AUTORE
|
Nickname: Claudy
|
|
|
|
Et�: 44 Prov: VR |
I MIEI BLOG AMICI
- Colorimmagini
- drops of.. Mara
- Libera di creare
- PATCHWORK.. di Laura
- Thirty Something di Andrea
- il diario che non cè
- rieccomi
- scrapmania
- ....Temptations....
- il baule dei sogni
- *Hobby*Grafica*
- Nuvole di pezza
- MAMMA E NON SOLO
- Meneraccontiunaltra
- ARTEKYARA
- LaNinfaMaia
- TANTO PER SAPERLO
- Le mani in Pasta
- voglio volare....
- SILVY
- manuxxxep
- Lachouette
- LA RETE X CHIARA
- IO AIUTO CHIARA
SITI E BLOG AMICI
- debbie mum.. patchwork per eccellenza
- L'hotel più speciale....
- biglietti giapponesi
- puntocroce
- il tempo ritrovato di federica
- nuvole rosa di Sabrina
- Il blog di bettin
- Selena e le sue creazioni
- Solo crocette di Rosa
- Luijo.. il suo blog Tilda
- Nuvole e farfalle di Francip
- Milena, fantasie e ricordi
- rosa e crocette di elena
- Marzia e i suoi giochi di colore
- Marta emozioni in patchwork
- Maria Rita e le sue roombox
- Il blog di Lisa
- Stefania... le mie crocette
- I ricami di Elisabetta Penny
- Patrizia, luce polverosa
- Gloria .. like a little pink pebble
- Marina, profumo di iris
- Il blog di M.Rita.. dire, fare, baciare....
- Antonella e Anna Maria, quattro manii creative
- Michele's blog
- Lucia, lo scrigno di luci
- Simonetta, country desires
- Brunella, il rifugio delle fate
- Linda con pane, amore e creatività
- Chiara, la soffitta di swamy
- Annamaria cuori e perline
- Sabrina recuperando
- Elena: fiori, fili e fantasia
- Country Laura
ULTIMI COMMENTI
ULTIME VISITE AL BLOG
MMMHHH CHE BONT�!!
E' innegabile, adoro le ricette che presenta
di Benedetta Parodi.. quelle più veloci
ovviamente 
Ultimamente la torta di cioccolato e ricotta
è diventato il mio cavallo di battaglia,
quella cosa che in mezzora fai quando
sta per arrivare un ospite inaspettato.
Sarà che adoro la ricotta e in casa non
mi manca quasi mai, e sarà che fatalità nel
mio frigo non c'è quasi mai burro ma insomma
per questa torta ho sempre tutti gli ingradienti.
Ve la passo così potete sprimentarla
ingredienti:
300g di ricotta
200g di zucchero (vien bene anche col fruttosio)
3 uova
200g di farina
1 bustina di lievito
2 cucchiai di cacao amaro (anche 3 )
150g di gocce di cioccolato (io ci butto dentro anche altra cioccolata)
Amalgamare la ricotta con lo zucchero, aggiungere
le uova. Aggiungere la farina con il lievito, mescolare
bene e aggiungere il cacao amaro e le gocce.
Rivestire una teglia con la carta forno, versare il composto
e cuocere per 30 min a 180°.
Se non la mangiate a colazione, potete
servirla con del cioccolato fuso o panna.. o tutte e 2!!!!
TAG
TAG CLOUD
CERCA IN QUESTO BLOG

tema: estate
1) la base deve essere
azzurra... (qualsiasi tipo
di blu o azzurro...)
2) ci devono essere
particolari bianchi
3) un solo piccolo
particolare rosso...
spedizione: 12-15 giugno
SARAH KAY
 Sarah Kay lives in Australia.

Inviato da: minarossi82
il 11/11/2016 alle 18:07
Inviato da: paperinopa_1974
il 08/03/2016 alle 19:34
Inviato da: paperinopa_1974
il 15/02/2015 alle 11:00
Inviato da: paperinopa_1974
il 19/10/2014 alle 13:43
Inviato da: silvia
il 14/08/2014 alle 12:19