Avenues for Resolving Data Damage on the QuickBooks Company File

Are you facing unexpected data damage in Company file in QuickBooks? Company files constitute the epicenter of all accounting information in QuickBooks. Any damage in the company files can result in permanent data damage on your QuickBooks desktop company file . In order to get the multifarious data related issue in the QuickBooks Company file, readers should perform the walkthrough provided in this illustrative blog.

Solutions for fixing data damage in QuickBooks Desktop Company file

Perform the solutions below one by one in order to get the data damage repaired in QuickBooks.

Solution 1: Run the Rebuild Data tool

The first workable avenue is to use the Rebuild data tool to fix the issues in the Company file . For this, you need to perform the steps mentioned below:

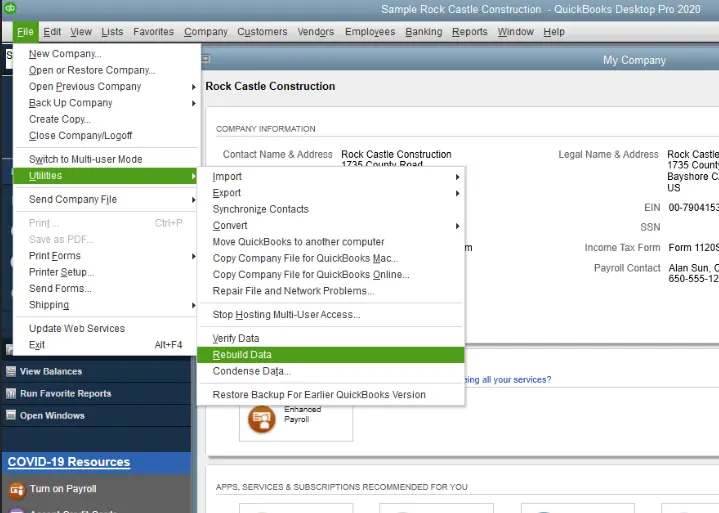
  • In the beginning, click on the File menu and soon after, go to the Utilities option.
  • Herein, proceed by clicking on the Rebuild Data option.

  • A screen will pop up on the screen prompting for the creation of a company file backup before performing the fixes for the error. Provide consent to the prompt.
  • Now, use the Rebuild tool for fixing the issues in the Company file, including the data damage issues.
  • Once the process is finished, hit on Ok
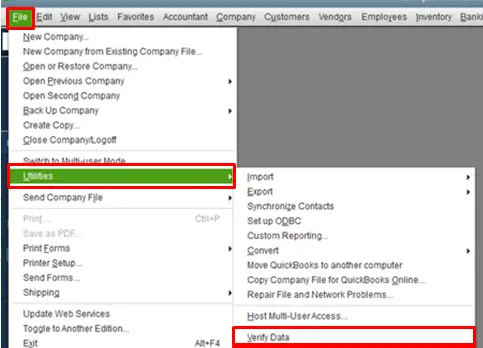
  • Afterwards, click on the File tab, and again advance to the Utilities tab.
  • Following that, click on the Verify Data option and allow the tool to perform the diagnosis on the Company file to check if the Rebuilding process proved effective.

Solution 2: Running the QuickBooks File Doctor

Intuit has rolled a savior troubleshooting tool called the QuickBooks Tool Hub program. This tool contains advanced tools for fixing multiple issues in the company file. For this,

  • Initially, download QB Tool Hub, and once successfully downloaded, the user needs to install the tool.
  • Following a successful installation, run the QuickBooks file doctor tool and advance to the Company Problems tab.

  • Browse for the Company file and scan the file to diagnose and fix issues existing within the file, including the data damage on QuickBooks Company file.

Solution 3: Restore the backup of the company file

The final resort to fix data damage on your QuickBooks Company file involves restoring the backup of the Company file. For that, proceed as per the following steps:

  • Run QuickBooks and following that, move to the File tab.
  • When in the File tab, choose the option to Open or Restore Company.
  • Following that, click on the Local Backup option, and followed by that, hit on Next.
  • The next step requires browsing the system for the backup Company file.
  • Opt for the location to save the restored company file backup, and proceed with the backup process.


Conclusion

This article presented a detailed description of the various methods that can help troubleshoot data damage on your QuickBooks Desktop Company file . For additional assistance, feel free to reach out to our QuickBooks desktop error support experts at the helpline ie, 1-800-761-1787.

Process To Reactivate QuickBooks Payroll subscription

The current blog entails a comprehensive procedure to reactivate QuickBooks Payroll subscription. For reactivation of the payroll subscription, users are required to set up the latest updates for QuickBooks Desktop Payroll. To know get attuned to the process, users should follow this blog till the end.

Process To Reactivate QuickBooks Desktop Payroll subscription

Process 1: Use the website

  • To sign into your QuickBooks My Account for the first time, use your Intuit username and password.
  • Select the item you want to manage by going to the ‘Manage your QuickBooks page’
  • Select the Payroll Subscription option under the Products & Services menu.
  • Under the blue Toolbar, you can see your subscription’s status. On this instance, you can see the cancellation in your subscription status. then click the Resubscribe button next to the status.
  • Re-verify the accuracy of all the information in the Reactivate Subscription boxes before clicking Save and Continue.
  • Now, double-check the subscription details and billing information.
  • After that, press the Reactivate button.
  • Your screen will now display a pop-up message informing you that your payroll subscription has been reactivated. Click Got it.
  • The full reactivation of your membership may take up to 24 hours. Once it has been reactivated, your membership will appear to be active.


Process 2: Using the Desktop file

  • Open the QuickBooks program and opt for the Employees option.
  • After that, select the ‘Account Billing Information’ option under the ‘discover my Payroll Service’

  • You must right now sign into your Intuit Account.
  • Opt for the Reactivate link next to the service status in the Service Information section.
  • Select the payroll service you desire, and then click Continue to complete your purchase.
  • Select a payment method by selecting it.
  • By hitting on Submit, you have the complete right to change, add, or update your payment information.
  • Now, hover your cursor over the Place Order button and click it.
  • After that, tap on Next to go back to the QuickBooks Desktop program.
  • To check that your service is working, go to My Payroll Service, select Employees, and then try to sign in using the same user ID and password.
  • After that, click the link for Account/Billing Information to check the Service Status.


Also check: Set up landed cost in QuickBooks


Process 3: Using the Cancelation Email

  • Open your email account after logging in, then choose Resubscribe. By doing this, you will be taken to the Intuit QuickBooks My Account page.
  • To sign in, use your Intuit Login credentials.

  • Right instantly update your payment information, then select Save and Continue.
  • Click Reactivate after making sure that all of the information entered on the previous page is accurate.
  • The following notice now appears on the screen: Your Subscription is reinstated!
  • Afterward, hit on Got it.
  • The reactivation process could potentially take up to 24 hours to complete.


Method 4: Through My Account section

  • To go to the QuickBooks Desktop software’s My Account feature, enter your Intuit login details or credentials.
  • Click the item you wish to manage under Manage your QuickBooks page.
  • After that, select the ‘Payroll Subscription’ option that can be found under the ‘Products & Services’
  • You can see the status of your subscription in the status bar in the page’s upper right corner.
  • If you’ve already renewed your subscription, the status will say Active.


You may also read: Fix QuickBooks won’t open


We sincerely hope the instructions provided for reactivating the QuickBooks payroll subscription were helpful to you. Please feel free to contact our QuickBooks professionals  at 18007611787,  if you have any additional questions about the subscription process. Our team will see to it that all of your problems are resolved.