How to Fix Spotify Installation Error Code 53 on Windows

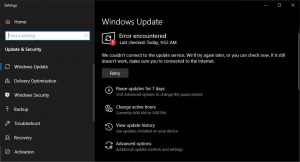
Spotify is quite a popular music platform with over 50 million tracks of every genre. Spotify provides records and music of every type, and users always find this music platform quite amazing. Spotify is trending today and needs no introduction to anyone. On Spotify, users can search for music and tracks through artists, albums, and radio stations. This music platform also allows you to search for a specific track or music through your friend’s music collection on their smartphone, PC, tablets, etc. Users need to install the Spotify app first to explore its amazing music features. Besides this, sometimes they face an error code 53, which interrupts the installation of Spotify on their smartphones and PC. The error prevents users from installing the Spotify app. Here are the best methods to fix this error.

Fix Spotify Installation Error

By checking if you have Spotify pre-installed

  • At first, click on the Start button.
  • Type ‘Control Panel’ in the search box.
  • Next, choose Control Panel from the results after the search.
  • Now, click on uninstall a program under Programs.
  • Type ‘Spotify’ in the search box available at the top right side of the Control Panel
  • If you find it in results, uninstall and then try installing it again.

By moving the hidden roaming Spotify folder

  • First of all, open the official Spotify website and download the web installer file.
  • After that, normally run the SpotifySetup.exe on your PC or laptop.
  • Once you try to run the Setup file, the installation will fail by showing Error 53.
  • Do not close the launcher when you see this error once again.
  • Next, click on the Start button or alternatively the Windows button on the keyboard.
  • In the search box, type ‘Shown Hidden Files.’
  • Now, click on the Show Hidden Files option from the results.
  • After that, click on the Show Settings option.
  • After clicking on Show Settings option, it will open a new
  • In the new window, select the Show hidden files, folders, and driver option.
  • Click on Apply.
  • After that, click on, OK.
  • Press Windows Key + R.
  • Enter the following command: C:/Users/<yourusername>/AppData/Roaming.
  • Now cut the Spotify folder once you locate it.
  • Next, type in the following command in the search bar: C:/Users/<yourusername> and paste the folder here.
  • At last, try to install the app again and check if the issue persists or not.

Aida Williams is a creative person who has been writing blogs and articles about cybersecurity. She writes about the latest updates regarding norton.com/setup and how it can improve the work experience of users. Her articles have been published in many popular e-magazines, blogs, and websites.

Source – Fix Spotify Installation Error Code

How to Fix Update Error 0xc8000247 on Windows

There are an innumerable errors that occur in Windows software, and many of them can be fixed if one knows the right methods of fixing them. There often occurs an error with code 0xc8000247 on Windows software that prevents users from installing any new update with the Windows update component. There are reports by users that show that error only occurs in installing certain updates. On the other hand, the error mostly occurs on Windows 7 t. So if you face the same error on your Windows PC or laptop, then you have come to the right place. There are methods available in this article for you to fix this issue in no time. Go through the methods below and fix this 0x8000247 error on your Windows system.

Windows Update Error

By running the Windows Update troubleshooter

It is always advisable to use Windows Update troubleshooter which is a built-in utility that comes with Windows software. The troubleshooter of Windows Update has the capability of fixing such issues in no time on your PC. And to run this troubleshooter, follow the steps listed below:

  • Press Windows Key + R to open up the Run dialog box.
  • Type ‘ms-settings-troubleshoot’ and click on the OK button to open up the Troubleshooting tab from Settings of your PC.
  • After opening up the Troubleshooting tab, go to the Getup and Running section.
  • There lies the option Windows Update, click on it.
  • Inside the Windows Update tab, click on Run the Troubleshooter option from the context menu.
  • Once this utility starts, it will show you some repair strategies if it could find one.
  • After completing the scan, run the repair strategy on your PC and wait until it finishes.
  • At last, restart your PC, and you are good to go.

By uninstalling the Third-Party application

There are chances that you have been using some third-party applications on your Windows PC, and they are causing this issue. Check these applications and uninstall the suspected ones from your PC to fix this issue. Third-party apps often require permission to install unknown sources on your PC, and it leads to occurring such issues on your PC. To uninstall third-party applications, go through the steps listed below:

  • At first, double-click on the Computer shortcut on the main desktop to open it up.
  • Once you are inside the Computer section, click on the Uninstall or Change a Program option.
  • Once you enter inside this tab, a list will appear showing every application and program installed on your PC.
  • Select the third-party applications from the list and right-click on them.
  • Now, choose the Uninstall option from the options and uninstall them one by one.
  • At last, restart your PC, and you are good to go.

Salena Williams is a creative person who has been writing blogs and articles about cybersecurity. She writes about the latest updates regarding norton.com/setup and how it can improve the work experience of users. Her articles have been published in many popular e-magazines, blogs, and websites.

Source –  Windows Update Error

How To Lower CPU Usage By Srvany.exe?

Is your system working slow? The solution to this issue is going to the Task Manager and seeing what is taking up the maximum resources. Over here, you will get to know the reason behind your computer’s slow speed. If the Sevany.exe is consuming half of the resources, then this blog is perfect for you.

Tech

Method 1: Scan your device due to malware

  1. Firstly, go to the Settings app by pressing the combination of the Windows+I button.
  2. Then, press on Update and Security.
  3. After that, go to the left-hand side of the menu and choose Windows Security.
  4. As soon as you go to the Windows Defender Security Center, you need to visit the right-hand side of the screen and press ‘Run a new advanced scan’.
  5. Next, tap on Full Scan.
  6. Lastly, press on Scan Now.

If you are good with the technical stuff, then do according to the given below steps.

  1. Firstly, put the combination of the Windows+R button.
  2. Then, write ‘regedit’ into the bar.
  3. After that, tap on Enter.
  4. Next, visit the left-hand side of the screen and go to the given below:
  5. HKEY_LOCAL_MACHINE\SYSTEM\CurrentControlSet\Services\Srvany.
  6. After that, do a right-click on the Start button. It shall be located on the right-hand side of the screen.
  7. Next, choose Modify. It will be present in the context menu.
  8. Lastly, put the Value Data 4.

 Method 2: Do a clean boot

  1. Firstly, visit the taskbar and tap on the Search symbol.
  2. Next, go to the box and write ‘msconfig’.
  3. Then, tap on ‘Enter.’
  4. After that, enter the Services option.
  5. Next, choose ‘Hide all Microsoft services’ option.
  6. After that, press on Disable All.
  7. Then, visit the Startup option and press on Disable.
  8. Next, exit the Task Manager.
  9. After that, return to the System Configuration
  10. Then, press on OK.
  11. Lastly, restart the device.

Method 3: Update the OS

  1. Firstly, put the combination of the Windows+I button on your keyboard for going to the Settings application.
  2. Whenever you go to the Settings application, you need to tap on Updates and Security.
  3. Then, move to the left-hand side of the screen menu and press on Windows Update.
  4. After that, press on Check for Updates. It shall be located on the right-hand side of the display.
  5. If there are any updates given over there, you need to download and install them.
  6. As soon as the device is done with the downloading of the updates, you need to restart it.

Howdy, I’m Paul Smith. I’m a student living in the United States. I am a fan of technology, web development, and programming. I’m also interested in acting. You can view my listings with a click on the button above mcafee.com/activate.

Source – CPU Usage By Srvany.exe

How to Export Google Chrome Extensions?

Extensions in Google Chrome Web Store do not disappear, but they will not be available in the store in case the developer decides to remove them, or else a certain feature may get removed after updates. In case you want to export Google Chrome extensions, then read on.

Google Chrome

Check Out the Google Chrome Profile

  • First of all, launch Google Chrome on your device.
  • Then you should select the vertical ellipsis menu icon in the upper right-hand side of the screen.
  • You have to select the Settings option from the drop-down section.
  • Thereafter beneath the “People” section, check the profile you are using currently.
  • When it’s not, select the small arrow near the name of profile & move the profile.

Export Google Chrome Extensions as CRX Files

You need to export Google Chrome extensions as CRX files. Follow the instructions given below.

  • Get started by opening Google Chrome on your device.
  • Then you should click on the vertical ellipsis menu icon.
  • You have to move the cursor above “More Tools” unless a new menu comes.
  • Thereafter select the Extensions.
  • You should go to the Extensions menu & turn on the “Developer mode.”
  • Put the same ID that comes beneath the extension that you would like to pack.
  • To launch the Windows Explorer, press the Windows + E keys.
  • Later, you have to the following path: C:\Users\<Username>\AppData\Local\Google\Chrome\User Data\Default\Extensions.
  • You should find the folder that has the ID.
  • Navigate to the Desktop & copy it.
  • Return to the “Extensions” menu.
  • Now, go to the upper left-hand side menu & click on the “Pack Extension.”
  • If the new screen comes, choose the “Browse” option near to the bar of “Extension root directory.”
  • Check out the folder which you have shift to the desktop, open it, & select the folder with the same version number as its name.
  • Later, click on, OK.
  • Then you should click on the “Pack Extension” option. Keep the “Private key file” section blank.

Importing Extensions

If you want to import extensions, then you need to follow the instructions given below.

  • To begin with, launch the Extensions menu.
  • Then you have to find the CRX file on the computer.
  • Move & place the CRX file from its location to Google Chrome’s Extensions menu.
  • Now, you have to wait for installing the extension.

Howdy, I’m Paul Smith. I’m a student living in the United States. I am a fan of technology, web development, and programming. I’m also interested in acting. You can view my listings with a click on the button above mcafee.com/activate.

Source – How to Export Google Chrome Extensions

How to Set Up & Use Sonos Speakers on iPhone or iPad?

Sonos speakers are amazing when it comes to sound quality, built, and bass. You can also connect them with iOS devices. The process to do so is not too difficult. Follow the guidelines mentioned below and learn how to set up and use your Sonos speakers with an iPhone or iPad.

Sonos_AirPlay2_01.0

Sonos App Download for iPad & iPhone

If you want to download the Sonos application for iPad & iPhone, then you need to follow the instructions given below.

  • First of all, navigate to the App Store on your iPad & iPhone.
  • After that, go to the search bar.
  • Then you should type Sonos into the search bar.
  • thereafter select the app and tap on getting.
  • Later, tap on Install.

Organize the Sonos Speaker

You can organize the Sonos speaker on the iOS device. Here are the instructions for doing so.

Create Account:

  • Get started by opening the Sonos Controller application on your iOS device.
  • After that, you should tap on Create account option.
  • Then you should input your email ID & a strong password.
  • You have to switch the toggle to accept the terms & conditions.
  • Thereafter, select Create Account.
  • Later, navigate to the email ID to verify the address.
  • Now, select the Confirm email ID option.
  • After that, you should back to the Sonos application.
  • Then tap on Continue.
  • To start setting up the speakers, tap on Continue again.
  • Later, you will be asked to choose between the Standard or BOOST network. You can select according to your preference.
  • Tap on Next to start setting up the first speaker.

Use an Existing System:

  • To get started, go to the Sonos Controller application on your iOS device.
  • After that, select the More option.
  • Then choose Settings.
  • Thereafter, you should select Add a Player or SUB option.
  • Now, go with the steps below beneath “Add a new speaker.”

Adding a New Speaker:

  • First, you have to plug n the Sonos speaker to a power outlet.
  • After that, tap on Next.
  • When you see a green flashlight on the Sonos device, tap on continue.
  • Sonos will find any suitable speakers for its system. Select the one you would like to set up.
  • Then find the pairing button on the Sonos device and tap on it, then leave.
  • When the device connects, tap on Next.
  • Later, select the room wherever you want to set up the Sonos speaker.
  • Now, choose Next.

Complete the Set-Up Process:

  • First & foremost, if the Sonos device updates available, you will tap on Next & start the update process.
  • After finishing the update, tap on Continue.
  • Then your Sonos device will register to the account automatically.
  • To use the process of Trueplay tuning process of Sonos.
  • When the set up has completed, tap on Done.

Set Up Sonos & Alexa:

  • If your Sonos device is Alexa-enabled, then you should tap on “Sign in to Amazon.”
  • After that, you should input the Amazon details & tap on login.
  • The tap on “I agree.”
  • Thereafter tap on Continue.
  • Later, open the Alexa application on your iPhone.
  • Now, select the hamburger icon.
  • Then tap on Skills.
  • Beneath Search all skills, input Sonos.
  • Now, tap on Enable Skill.

To Adding Apple Music or Another Music Streaming Service to the Sonos Speaker

If you want to add Apple Music or another music streaming service to the Sonos speaker, then you need to follow the instructions given below.

  • Open the Sonos Controller application on your device.
  • After that, you should tap on More.
  • Then you have to tap on Add Music Services.
  • Thereafter tap on the streaming service you would like to add.
  • Later, tap on Add to Sonos.
  • Now, tap on the option to connect the service.
  • After that, approved the streaming service with the account details.
  • Then you should return to the Sonos application & tap on Continue to finish the process.

Playing a Streaming Service on the Sonos Speakers

You can play a streaming service on the Sonos speakers. The instructions are given below.

  • First, you have to go to the Sonos Controller application.
  • After that, tap on the Browse option.
  • Then choose the streaming service you would like to add.
  • Thereafter choose the content you would like to stream.
  • Tap on Play Now.

Adding Content to My Sonos in the Sonos Application

If you want to add content to my Sonos in the Sonos application, then you need to follow the instructions given below.

  • To begin with, navigate to the Sonos Controller application.
  • After that, select the Browse option.
  • Then choose the streaming service you would like to use.
  • Thereafter, you should choose the content you would like to add to My Sonos.
  • Select the More button near to the content.
  • Now, tap on Add to My Sonos.

Rosy Williams is a creative person who has been writing blogs and articles about cybersecurity. She writes about the latest updates regarding mcafee.com/activate and how it can improve the work experience of users. Her articles have been published in many popular e-magazines, blogs, and websites.

Source – Use Sonos Speakers on iPhone or iPad

How to Turn Off Google Chrome Notifications?

Desktop notifications are one of the most amazing features of internet browsers. They tell you about the previews of mail, weather, news, etc. You can check important stuff right from the desktop. However, some users find it distracting and annoying. Here’s how you can disable Google Chrome notifications.

Google Chrome Notifications Function

Android:

If you want to disable Google Chrome notifications function on Android, then you need to follow the instructions given below.

  • First of all, open Google Chrome on your Android device.
  • Then you should tap on the vertical ellipsis menu icon.
  • Go to the Settings option.
  • You have to select the Site Settings option in the Settings menu.
  • Navigate to the Notifications section.
  • Now, a listing of the websites that are denied & a listing of websites that are permitted to send notifications will appear. At the upper portion, Notifications heading will be present. Move its toggle to turn them off.

Turn Off Notifications for All Sites

  • Get started by opening Google Chrome on your device.
  • Go to the website you would like to prevent from sending you notifications.
  • Then you have to tap on the vertical ellipsis menu icon.
  • Choose the Info option.
  • Navigate to the Settings.
  • You should launch the Notification section.
  • Choose the Block option.

Chromebook:

You need to get rid of the notifications on Chromebook. Follow the instructions given below.

  • To get started, open the Google Chrome on the Chromebook laptop.
  • Then you should click on the vertical ellipsis menu icon.
  • You have to go to the menu & select Settings.
  • Move all the way to the lower & select the Advanced option.
  • Navigate to the Privacy & Security section.
  • You should select Site Settings option.
  • Press on the toggle located beside Ask before sending and disable the notifications. In case you wish to block a specific website, then just click the Add option located beside Block. Input the site name & press the Add button.

Computer:

If you want to disable Chrome notifications on a computer, then you need to follow the instructions given below.

  • To begin with, open Google Chrome on the desktop computer or laptop.
  • You should click on the vertical ellipsis menu icon right of your profile.
  • Then you have to go to the drop-down menu & select the Settings option.
  • Navigate to the Settings screen & move all the way to the end. Select the Advanced option.
  • Find the Privacy & Security section.
  • Thereafter you should select the Site Settings option.
  • Later, you have to select Notifications.
  • If you would like to block notifications all at once, you should disable the Ask before sending option.

MacBook: 

You need to disable Chrome notifications on your MacBook through Notification Center. Follow the instructions given below.

  • To open the Notification Center on the MacBook, select the Bell icon.
  • Then you should select the Settings icon.
  • Now, you have to untick the boxes near the websites & services you would not like to get notifications from.

Rosy Williams is a creative person who has been writing blogs and articles about cybersecurity. She writes about the latest updates regarding mcafee.com/activate and how it can improve the work experience of users. Her articles have been published in many popular e-magazines, blogs, and websites.

Source – Turn Off Google Chrome Notifications