How to Set Up Restrictions and Parental Controls on iPhone and iPad?

Do you have kids in your household? If the answer is yes, then you must be aware of how important it is to restrict and control their device usage. If you have an iOS device, then you can set restrictions and customize parental control. Read on and learn how to do so.
iPhone

Rating Region for Restrictions

If you want to select the rating region for restrictions on iOS, you need to follow the instructions given below.

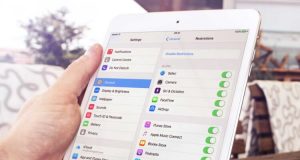
  • First of all, you should open Settings on your iPhone and iPad.
  • After that, you have to tap on Screen Time option.
  • Then, you should tap on “Content and Privacy Restrictions.”
  • Thereafter, you have to tap on “Content Restrictions.”
  • Later, you should tap on “Ratings For.”
  • Now, select the region or the country.

Block Certain Content by Ratings with Restrictions

You can block certain content using the ratings with restrictions on iOS. Here are the instructions given below.

  • Get started by opening the Settings app on your iPhone and iPad.
  • After that, you should tap on Screen Time.
  • Thereafter, you have to tap on “Content and Privacy Restrictions.”
  • Then, you should tap on “Content Restrictions.”
  • Later, you should select each content type beneath the Allowed Content field. Your options include, Podcasts, News, Movies, Music, TV Series, and Applications.
  • Now, tap on the rating you want to permit on your iPhone and iPad.

Hiding Movies in Cloud

If you want to hide films in the cloud on the iPhone and iPad, you need to follow the instructions given below.

  • To get started, open Settings on your iPhone and iPad.
  • After that, you should tap on Screen Time.
  • Then you have to tap on “Content and Privacy Restrictions.”
  • Thereafter, you should tap on “Content Restrictions.”
  • Later tap on Movies.
  • Now, you have to tap on “Show movies in the cloud On/Off Switch.”

Hiding TV Shows in the Cloud

You can hide TV series in the cloud on iOS. Here are the instructions given below.

  • To begin with, go to the Settings on your iPhone and iPad.
  • After that, you should tap on Screen Time.
  • Then you have to tap on “Content and Privacy Restrictions’.
  • Thereafter, you should tap on “Content Restrictions.”
  • Later, you have to tap on TV Shows.
  • Now, tap on the Show TV shows in the Cloud ON/Off Switch.

Block Multiplayer Games from Game Center

For blocking multiplayer games from your iOS device, you need to follow the instructions given below.

  • First, you have to open the Settings app on your iPad and iPhone.
  • After that, you should tap on Screen Time.
  • Then, you have to select “Content and Privacy Restrictions.”
  • Thereafter, you should tap on “Content Restrictions.”
  • Later, tap on Multiplayer Games.
  • Tap on “Don’t Allow.”

Block Adding Friends from Game Center

You can block adding people from the game center on iOS. Here are the instructions given below.

  • Get started by open Settings app on your iPad and iPhone.
  • After that, you should tap on Screen Time.
  • Then you have to tap on “Content and Privacy Restrictions.”
  • Thereafter, you should tap on Content Restrictions.
  • Tap on Don’t Allow.

Block Screen Recording

If you want to disable screen recording on iOS, you need to follow the instructions given below.

  • To get started by open Settings app on your iPad and iPhone.
  • After that, you should Screen Time.
  • Then, you should tap on “Content and Privacy Restrictions.”
  • Thereafter, you have to tap on Content Restrictions.
  • Later, you should tap Screen Recording.
  • Tap on Don’t Allow.

By following the instructions mentioned in the blog, you will be successfully able to use restrictions and parental control on the iPhone and iPad.

Source – How to Set Up Restrictions and Parental Controls on iPhone and iPad

How To Mount Network Shares on Linux Automatically

Let’s face the fact that Linux is amongst the most complicated computer software. Several tasks are quite complicated o Linux, and mounting network shares is one of them. Several Linux users complain about having trouble in mounting the network on their Linux computer and laptop. It prevents users from using the Internet and leaves them helpless with no other alternative option to resolve this issue. Everything runs smoothly when you are able to mount that wireless internet connection you have with your Linux system. If you are amongst the users who is facing the issue in mounting the network on your Linux PC, then you have come to the right place. Here are some of the best and effective methods on how you can do the task in no time.

How To Mount Network Shares on Linux Automatically

By Restoring The FSTAB Backup File

Follow the steps listed below to restore the FSTAB backup file and mount the network;

  • Get Sudo -s to get a root shell.
  • Now, go to etc. and then Folder.
  • Delete broken FSTAB file in the Folder.
  • Now, copy the backup file by going back to the etc / directory by following the location ; cp /home/username/system-backups/fstab /etc/.
  • After that, change the name of that backup file.

By Automatically Mount NFS Share

It is another method you have to solve the issue. To do so, follow the steps listed below;

  • First of all, locate the share you are willing to mount.
  • Now, create a directory in which where the share would be mounted.
  • Access that FSTAB file by using nano – sudo-sudo/etc/fstab.
  • Type the command for that mount which is; servername: /data /home/username/Network-Files nfs rsize=8192, timeo=14, _netdev 0 0
  • Now reboot the system, and you are good to go.

By Backing Up Of The FSTAB File

It is the first thing you have to do before initiating for the further process. It’s quite essential to backup the FSTAB file. Backing up FSTAB file is necessary due to its importance as well as a presence in the further process of mounting the shared network. To do so, follow the steps listed below;

  • First of all, create a folder where you would keep the FSTAB file as a backup.
  • Use the command mkdir ~/system-backups to save the backup to the flash drive.
  • Now, you need to use sudo-s to get a root shell and select etc.
  • Now, backup that FSTAB file and store it in the Folder by following this command; Cp fstab /home/username/system-backups
  • After successfully storing the file in the Folder, rename it.
  • Now you have successfully backed up the FSTAB file and can now proceed for further process.

Source – How To Mount Network Shares on Linux Automatically

How to Create Folders And Group Apps On iPhone

Creating folders on an iPhone is a fantastic method for clearing obsolete and useless applications from the home screen. Keeping similar field applications altogether shall make your work simple. For instance, all your study related apps like the book reading app, news app, and dictionary app should be kept together. It saves time and makes everything organized.

How to Create Folders And Group Apps On iPhone

Method 1: Making folders and group applications on an iPhone

  1. Firstly, to make a folder, you need to have more than one application in the folder. Select whichever you wish to have with you now.
  2. Then, do a long press on the applications till every application on display begins moving. This procedure is entirely like rearranging the apps.
  3. After that, shift one of the applications above of the other. As soon the first application mixes with the other, lift your fingers from the display. Putting one application on top of the other makes a folder.
  4. You might have noticed that each of the folders has an allotted name to it by default. However, you can modify that name. Click the symbol of x for removing the suggested name. Next, write the name according to your wish. If you wish to put more applications to the folder, press the wallpaper for closing the folder. After that, put more apps into the newly made folder.
  5. As soon as you’re done putting every application- you wish to have and completing the edited name, press the Home option, and note that your changes have been saved.
  6. Remember! If you are the owner of the iPhone X, XS, XR, there is going to be no Home button option. Rather, you need to press on Done option. It shall be towards the upper side at the right-hand side corner of the display.

Method 2: Editing folders on an iPhone

  1. Firstly, for editing the existing folder, do a long press on the folder until it starts moving.
  2. Then, press it one more time and note that the folder will open. And also that its matter is going to get displayed on the screen entirely.
  3. Now you can edit folders however you want.
  4. You can change the name of the folder by touching the name.
  5. You can add more applications by dragging and dropping it into the folder.
  6. You can remove applications from the folder by moving them out.
  7. Next, press the Home option or else the Done option for saving the modifications.

Source – How to Create Folders And Group Apps On iPhone

How to Set Your iPhone or iPad into DFU mode?

Do you want to get DFU mode on your iOS device? You may need it for restoring the firmware or troubleshooting the software. Whatever the reason may be, in this blog, you will learn how to access the DFU mode from your iPhone and iPad.

How to Set Your iPhone or iPad into DFU mode

Set DFU Mode on iPhone XR, XS or XS Max

If you want to set DFU mode on iPhone XR, XS or XS Max, you should follow the instructions given below.

  • Get started by connecting your iPhone XR, XS, or XS Max to the Mac or PC.
  • Ensure that iTunes is running on your device.
  • After that, switch off the iPhone XR, XS, or XS Max.
  • Then you have to long-press the power key for 3 seconds.
  • During still pressing the power key and long-press the volume down key.
  • You should keep holding both keys for 10 seconds.
  • When the Apple logo comes, you have pressed it for a long time.
  • Now, leave the side key but continue pressing the volume down key for 5 seconds.
  • Make sure, when the”Plug into iTunes” screen appears, you have pressed the keys down for too long and try once more.
  • If the screen stays black, then it means your device is perfectly in DFU mode.

Set DFU mode on iPhone 8 and iPhone X

You can set DFU mode on iPhone 8 and iPhone X. Here are the instructions given below.

  • To get started, connect iPhone X or iPhone 8 to the Mac or PC.
  • You have to ensure that iTunes is running on your device.
  • Then you should switch off your iPhone X or iPhone 8.
  • Thereafter, you have to long-press the power key for 3 seconds.
  • Later, long-press the volume down key.
  • Now, you have to keep pressing both keys for 10 seconds.
  • After that, you should release the power key and continue holding the volume down key for 5 seconds.
  • If the screen stays black, your device should be in DFU mode.

Set the iPhone 7 or iPad into DFU mode

If you want to set DFU mode on the iPhone 7 or iPad, you should follow the instructions given below.

  • To begin with, switch off your iPhone 7.
  • After that, you should connect the iPhone 7 to the Mac or PC.
  • Then you have to ensure that iTunes is running on your MacBook.
  • Thereafter, you should long-press the power key for 3 seconds.
  • Later, you have to long-press the volume down key on your iPhone 7 while pressing the power key.
  • Now, you should stay pressing both keys for 10 seconds.
  • After that, you have to release the power key but continue pressing the volume down key for 5 seconds.
  • If the screen remains black, it means your iPhone 7 should be in DFU mode.

Set the iPad Pro 2018 into DFU mode

You can set DFU mode on iPad Pro 2018. Here are the instructions given below.

  • First, you have to connect the iPad Pro 2018 into the Mac or PC.
  • After that, you should launch iTunes on your Mac.
  • Then you have to ensure that your iPad Pro is switched Off.
  • Thereafter, you should long-press the power key for 3 seconds.
  • Later, during still long-press the power key, long-press the volume down key also.
  • Now, keep pressing both keys for 10 seconds.
  • After that, you should let go of the Power key but keep pressing the volume key for 5 seconds.
  • If your device’s screen is black, your iPad Pro is perfectly in DFU mode.

By following the instructions mentioned in the blog, you will be successfully able to set your iPhone and iPad into DFU mode.

Source – How to Set Your iPhone or iPad into DFU mode?

How You Can Use Apple Pay With Your Face ID: A Complete Guide

Apple Pay is amongst the most used and likable features among iOS users. Apple pay allows iPhone and iPad users to make cashless transactions with your Face ID. Paying by using your Face ID is amongst the best and fastest way to make transactions in your favorite brand shops and retail stores. Many of the users still do not know how to use Face ID to make transactions in Apple Pay on their iPhone. Apple Pay is the official app designed by Apple to allow its users to make payments on a more secure payment app with several amazing features. If you are an iPhone user and do not know how to use your Face ID in it to make payments, then you have come to the right place. In this article, you will find some of the best step by step methods by which you can learn to use your Face ID in Apple Pay on your iPhone.

How You Can Use Apple Pay

Here’s how to pay at Retail via Apple Pay by using your Face ID

Users in the majority make payments via Apple Pay in places like a retail store from where you pick your monthly or weekly groceries and other necessities. To use your Apple Face ID in a retail store to make a payment, follow the steps listed below;

  • Unlock your iPhone and double click on the Side button to summon Apple Pay app.
  • After opening up of the Apple Pay app, look at your phone screen to authenticate your Face ID.
  • Switch cards if you are willing to use one other than your own default.
  • Tap on your iPhone screen to make the payment.
  • Keep in mind to open Apple Pay first before you tap on the terminal to successfully do the transaction.

Here’s how to pay on other devices  via Apple Pay by using your Face ID

Making payments to other devices is as easy as it sounds with Apple Pay app. Most of the time, users make transactions and payments on other devices due to innumerable reasons. If you often feel the urgency of making payments on other devices by using Apple Pay on your iPhone. Follow the steps listed below to do so in no time;

  • First of all, open up Apple Pay on your iPhone by tapping on it.
  • Go to send money option and select the recipient by entering the details in the blanks.
  • Tap on the send money option and authenticate it with your Face ID by looking on your iPhone.
  • Once the transaction is successful, you will be notified.

Here’s how to pay with an iPhone via Apple Pay even when Face ID can’t recognize you

It is a common case that users deal with when Face ID is unable to recognize your Face ID in using Apple Pay. If you often face this issue then you can alternatively make payments by using Apple Pay by following the steps listed below;

  • To initiate, tap on the Passcode pay option available.
  • Enter the Passcode you have set up to unlock your iPhone.
  • At last, tap on your Apple Face ID to make the payment.

Source – How You Can Use Apple Pay With Your Face ID

How to Create a Profile for Kids on Hulu to Block Specific Content

While watching Hulu, you may have thought about blocking some shows or movies sometimes. Maybe you’d want to block Hulu content on your Kids TV or device.  Unfortunately, there isn’t any option on Hulu to block an individual shows or movies. But, you can prevent Hulu from displaying TV-MA or R-Rated content on your device. And to do so, you’ll need to create a new profile in your Hulu account and select it for kids. A kids Hulu profile only displays kid-friendly programs. If you’re setting up Hulu for your child, then you can choose this. Moreover, you can do it from Hulu Mobile app as well as the Hulu website.

How to Create a Profile for Kids on Hulu to Block Specific Content

How to create a kids profile on Hulu using a smartphone or tablet

Creating a kids profile using a smartphone or tablet isn’t a big deal. All you need the Hulu app and your account’s login details and leave everything on the below steps.

1.   Open ‘Google Play Store’ on Android or ‘App Store’ on iOS, if you don’t have the app on your device. If Hulu app is already installed on your device, launch it, and continue from Step 6.

2.   Tap on ‘Search’ and type ‘Hulu.’

3.   Select ‘Hulu’ app from the results.

4.   And tap ‘INSTALL’ on Android or ‘Get’ on iOS to download and install the Hulu app on your device.

5.   After that, open ‘Hulu’ and login to your Hulu account.

6.   You may have to select a profile when you open the app, touch on your Profile name.

7.   Go to the ‘Account’ tab from the bottom menu.

8.   Now, touch your ‘Name’ near the top. It will also have an arrow facing down and tapping it expands a menu.

9.   Touch on ‘+ New Profile’ option.

10. You’ll reach the Create a New Profile page, touch on the ‘PROFILE NAME’ field, and type a name. If you’re creating it for your child, then you can enter their name.

11. Touch and enable the Kids button.

12. After that, touch on the ‘Create Profile’ button at the bottom.

This will create a profile for kids and blocks specific content. You’ll now see the created kids profile upon starting the Hulu app. And when Hulu is used with a kids profile, it will not show the R-Rated content.

How to create a kids profile on Hulu using Computer (Website)

1.  Visit ‘hulu.com’ with your desktop browser.

2.   Click on ‘LOG IN’ near the upper right side and open your Hulu account.

3.   If prompted to choose a profile, click on your name.

4.   After that, take the mouse cursor over your profile name or just click on it.

5.   Then click on the ‘+ Add Profile’ option. This will open the Create a New Profile form on your screen.

6.   Click the ‘PROFILE NAME’ field and type a name. If you’re creating it for your child, then you can enter their name.

7.   Then click and enable the ‘KIDS’ toggle switch.

8.   After that, click on the ‘CREATE PROFILE’ button.

This will create a profile for kids with blocked certain content. You can switch between the profiles by hovering the mouse cursor or clicking on your profile name at the upper right corner.

Source – How to Create a Profile for Kids on Hulu to Block Specific Content

How to Set Up the TV App for Apple TV?

If you are worried about how to setup the TV application for Apple TV and how to view your videos, don’t worry about that because with the help of this article you can access many video applications like HBO Now, CBS, Hulu and Starz. So, let’s get started.

How to Set Up the TV App for Apple TV

Watching a TV Show or Movie

If you want to watch a TV show or movie on TV Application, you need to follow the instructions given below.

  • First of all, you have to launch the TV application on your Apple TV.
  • After that, you should choose a TV show or movie from the Up Next option to continue to watch it instantly.
  • Then you should move down alternately to “What to Watch” or any other TV and movies fields.
  • Thereafter, you have to choose your selected shows.
  • Now, you should click on Play.

Connecting Application to the TV app

You can connect the application to the TV app. Here are the instructions given below.

  • Get started by launching the TV app on your Apple TV.
  • The app will ask you to connect applications like HBO Now, Hulu and Showtime on your TV application.
  • Now, click on Continue.

Delete Application Connection on TV App

If you want to delete application connection on TV Application, you need to follow the instructions given below.

  • To get started, launch of Settings application on your Apple TV.
  • After that, you should click on Applications.
  • Then you have to click on the TV.
  • Thereafter, you should choose what connection you would like to delete.
  • Later, you have to click on Remove to delete the application on your Apple TV.
  • Now, click on “Remove and Clear Play History” to delete the connection and remove all details about your app history.

Adding TV Shows and Movies to Up Next in the TV App

You can add TV shows and movies to up next in the TV app. Here are the instructions given below.

  • To begin with, launch TV application on your Apple TV.
  • After that, you should select a Tv show or movie which is not in the Up Next list.
  • Then, you should click on “Add to Up Next.”

Playing a Video From the Library

If you want to play a video from the library on TV Application, you need to follow the instructions given below.

  • To get started, open the TV application on your Apple TV.
  • After that, you should go to the Library section on the upper side of the screen.
  • Then you have to open the library and choose a show or movie.
  • Thereafter, you should click on Play.

Purchase Movies in TV App

You can purchase movies on the TV app. Here are the instructions given below.

  • First and foremost, open the TV application on the Apple TV.
  • After that, you should go to the Movies section.
  • Then you have to select the movie you would like to buy or rent.
  • Thereafter, you should click on Buy or Rent option to confirm.

Purchase TV Shows in the TV App

If you want to purchase TV shows on the TV Application, you need to follow the instructions given below.

  • First, you have to go to the TV application on your Apple TV.
  • After that, you should go to the TV shows section.
  • Then you should choose the TV show you would like to buy.
  • Thereafter, you have to move down and select “Buy Seasons.”

Watching Live Sports in the TV App

You can watch live sports on the TV app. Here are the instructions given below.

  • Get started by opening the TV application on the Apple TV.
  • After that, you should slide up on Apple TV remote.
  • Then you should choose the Sports tab.
  • Thereafter, you have to go through the options to locate one you would like to watch.

Use the TV Apps for the Favorite Teams

If you want to use the TV app for the favorite teams, you need to follow the instructions given below.

  • Go to the TV application on the Apple TV.
  • After that, you should slide up on the Apple TV remote.
  • Then choose the Sports tab.
  • Thereafter, you have to choose in the sport.
  • Later, you should make the selection.
  • Now, you should indicate Favourites to view every team which you have selected in one place.

Delete a Favorite Team From Apple TV

You can delete a favorite team from Apple TV. Here are the instructions given below.

  • Open the TV application on the Apple TV.
  • After that, you should slide up on Apple TV remote.
  • Then you have to choose the Sports tab.
  • Thereafter go to the end and select “Pick Your Favorite Teams” banner.
  • You should highlight the Favorites section.
  • Now, select the option that you would like to delete.
  • Select Remove.

Modify the feature of the Siri Remote Home button.

If you want to modify the feature of the Siri Remote Home button, you need to follow the instructions given below.

  • Launch Settings on your Apple TV.
  • Choose Remote and Devices.

Now, select the Home button to choose whether the Home button should take you to the Apple TV Home screen.

Source –How to Set Up the TV App for Apple TV?

Top 5 Face Changer Apps For Android Users

Face changer apps indeed are in trend nowadays. Majority of smartphone users around the world have started to use these face changer apps. It is quite a fun activity to change your face into an old face and into a kid’s face. There are hundreds of apps available for users to enjoy this trend, but very few users know which app to use with maximum features. If you are amongst the users who do not know which app face changer app to use, then you have come to the right place. Here I have shortlisted some of the best face changer apps with maximum ratings and users.

Top 5 Face Changer Apps For Android Users

FaceApp

FaceApp does not need any introduction to anyone. The app has become popular overnight because of its amazing face-changing features in it. FaceApp is at the top of face changer apps with maximum users and ratings on the play store. The app is being used even by famous celebrities. With the FaceApp, you can change your face into an old age face and into a kid’s face. The app also allows you to have a glimpse of your face if you were the opposite gender. It is quite fun to use FaceApp with amazing face-changing features in it.

Face Changer 2

Face Changer 2 is another amazing app which allows you to change your face into an older person’s face and much more. With the Face Changer 2 app, you can apply different types of beards and hairstyles on your photo and select which one will suit best on your face. Face Changer 2 app comes in the top face changer apps category on Play Store.

Cupace

Cupace is basically a photo editing app which also features face changing effects. Cupace offers a lot you want to edit a photo on your smartphone. You can easily make changes on your face with the Cupace app. The app allows you to edit your photo with several editing features in it. In addition, you can change up your face by applying effects and filters containing in it.

Face Swap Booth

The app is as amazing as it looks in its name. This app has several amazing editing and face changing features in it, which allows you to capture a photo with its in-built camera and edit it in no time. Users can also apply funny stickers and emojis on a photo with this app.

Funny Face Changer

Are you looking for something funny? This entertaining app will change regular face pictures into hilarious ones. Just take a selfie or use any other picture, and make it funny using this app.

Source – Top 5 Face Changer Apps For Android Users