How can I Fix QuickBooks Error 16026?

While updating the QuickBooks Desktop program, users may encounter QuickBooks error 16026. This technical issue is primarily due to corrupted Company File in QuickBooks and is most commonly encountered when opening the company files. This technical error may occur for a number of reasons, such as misconfiguration of the QuickBooks program or using an out-of-date version of the accounting program. However, there are several methods for fixing QuickBooks error 162026, that aim at rooting out the sources causing the error.

Reasons for QuickBooks Desktop Error 16026

  • The company file getting corrupted.
  • Incomplete QuickBooks installation.
  • Making use of an out-of-date version of Internet Explorer (IE 6.0 and earlier)
  • Out-of-date Operating system.
  • QuickBooks installation files got damaged.
  • Running an unsupported version of QuickBooks on the Operating system.

How to fix QuickBooks Error 16026?

  • Restart QuickBooks and launch the ‘Financial Institution directory’.
  • Go to: Finance >> Banking online >> Financial Institutions obtainable
  • If the ‘Financial Institution Directory’ is visible on the left, QuickBooks has successfully accessed Intuit online services.
  • If you can use your web browser to access the Internet from within QuickBooks, try downloading the most recent update for QuickBooks.
  • Double-click the QuickBooks desktop icon while holding down the ‘Ctrl+Shift’ keys simultaneously.
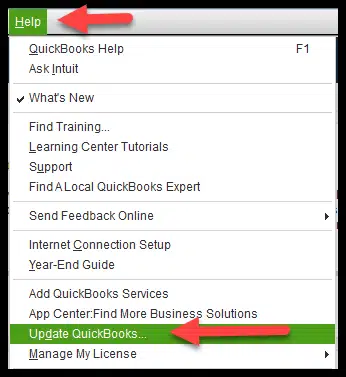
  • Select Help > Update QuickBooks Desktop.
  • Click on Get Updates upon clicking on the ‘Update Now’.
  • When all is done, click on “Close.”
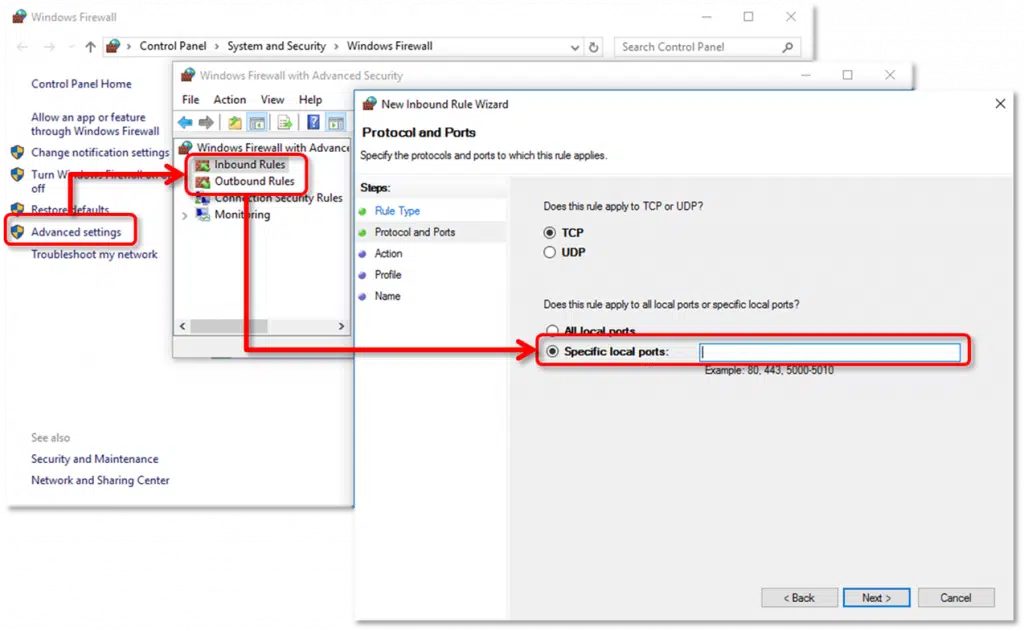
  • Verify the Internet Explorer ‘version’ and ‘cypher strength’ to see if they comply with the system requirements.
  • Start Internet Explorer.
  • Click on “About Internet Explorer” under “Help.”
  • Download the most recent version of Internet Explorer from Microsoft’s website if you are still using version 6.0.

Miscellaneous Solutions to fix QuickBooks Error 16023

Misc Solution 1: Use QuickBooks File Doctor Tool

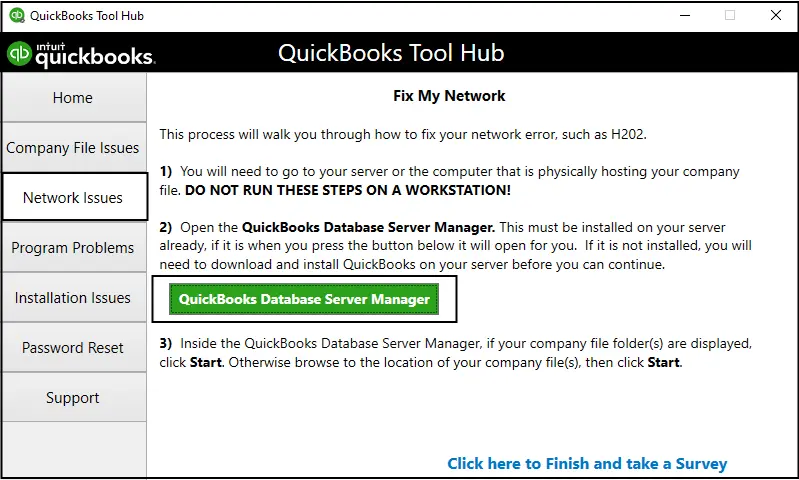
  • Download and Install QuickBooks Tool Hub.
  • Run the tool and access the File Doctor Tool.
  • Browse for the company file and scan for any technical issues.

Misc Solution 2: Rename ND and TLG files

  • Reach out to the QuickBooks folder and search for the ND and TLG files.
  • Right-click the files and select Rename.
  • Add “.old” at the end of the file name.
  • This should effectively fix QuickBooks Error 16026.

Misc Solution 3: Restore the company file

  • Run QuickBooks and click on the File menu.
  • Now, click on the Restore company option.
  • Choose the backup file and then opt for the location to save the file.
  • Once done, hit Enter.

The current blog discussed about the various methods to fix QuickBooks Error 16026. For assorted help, just call our experts at the helpline 1-800-761-1787.

Resolving the Error: QuickBooks Cannot Communicate with the Company File

Users may face different types of Company file errors in QuickBooks. One such error which many users have been coming across is QuickBooks cannot communicate with the company file error. This error indicates a general server communication issue caused by the Windows firewall blocking the user’s connection to the company file. To gain valuable insights into this error, including its causes and potential solutions, carefully read this troubleshooting walkthrough all to the end.


Major causes of QuickBooks Cannot Communicate with the Company File Error

This error can be attributed to several common causes. Below are enlisted the most common ones:

  • Outdated firewall software.
  • Disrupted server connection.
  • QuickBooks database server manager may be corrupted and not functional. In this context, the QBDBMgrN service may not run.
  • The DNS settings may be incorrectly configured.
  • Server-related configuration issues.
  • Outdated QuickBooks Desktop version.
  • Restricted permissions may be preventing the sharing of the company file folder.
  • Erroneous hosting settings.


Easy Resolutions for QuickBooks Cannot Communicate with the Company File Error

To rectify this error, you can follow these effective solutions:

Solution 1: Firewall Configuration

The first solution to fix this Company file error requires configuring the firewall by resorting to the below given steps:

  • Type Windows Firewall in the Start menu.
  • Open the Windows Firewall .
  • Access the Advanced Settings option.
  • Right-click on Inbound Rules and select New Rule.
  • Choose the Port option and click Next.
  • Ensure that TCP is selected.
  • Note down the specific ports required for your QuickBooks version in the Local Ports field.
  • Proceed by clicking on Next.
  • Allow the connection and hit on Next again.
  • Make sure to mark all profiles.
  • Click on Next.
  • Create a rule and provide a name.
  • Finally, click Finish.
  • Check if the Company file error got resolved. If not, proceed to the next solution.


Solution 2: Update QuickBooks Software

To update QuickBooks to the latest version, follow these steps:

  • Choose the updates you want to download. After that, click on Get Updates.
  • Select Update and wait for the process to complete.
  • After the update process finishes, restart your system and reopen QuickBooks to check if the error has been resolved. If not, move on to the next solution.


Solution 3: Check the QBDBMgrN.exe Process

  • Press the Ctrl+Alt+Del keyboard keys simultaneously.
  • Click on Open Task Manager.
  • Look for QBDBMgrN.exe under the Processes tab.
  • If the mentioned process is not found, grant administrative rights to QBDataServiceUser. The steps for the same are as under:
  • Close QuickBooks Desktop.
  • Press Win+R keys together.
  • Type in Control.
  • Hit the Enter key.
  • Select User Accounts in the Control Panel.
  • Click on Manage another account.
  • Double-click on QBDataServiceUser. And following that, click on Change Account Type.
  • Select the Administrator option.
  • Click on Change Account Type.


Solution 4: Run the QB Database Server Manager

Try running the QuickBooks Database Server manager to diagnose any network-related issues and to fix the same.

  • In case the Company file is not listed, browse to its location and then, click on Start Scan.
  • This tool will automatically repair firewall permissions.


Solution 5: Run QuickBooks Doctor File tool

The QuickBooks Doctor File tool (QBFD) is a versatile feature designed to troubleshoot various QuickBooks errors, including Company file and network-related issues. To use the tool for fixing this error, follow the steps outlined below:

  • Open the Tool hub.

  • Select the Company File Issues option.
  • Choose the option to Run QBFD.
  • Select the company file and click on Continue.
  • Provide the correct QuickBooks username and admin password.
  • Proceed by hitting on Next.
  • Allow the tool to complete the process. Once it finishes processing the company file, restart QuickBooks and check if the error has been resolved.


That’s it! This concludes the discussion and we hope that the walkthrough illustrated in this article helped readers in fixing QuickBooks cannot communicate with the company file error. For any queries or unresolved technical issues, call our experts anytime at 1-800-761-1787.

Solutions to Rectify QuickBooks Error 31600

QuickBooks Error 31600 is a commonly encountered technical issue that can lead to various problems within your QuickBooks software. This error is particularly concerning as it can potentially corrupt your valuable QuickBooks data. In this article, we will discuss Error 31600 and provide you with several solutions to fix QuickBooks error 31600 it. We shall also go through the various causes that lead to this error.

Instances where QuickBooks Error 31600 may occur

  • You may encounter this error while attempting to create a portable Company file.
  • When making a copy of the Company files.
  • This error may arise when using the Direct Deposit option to send paychecks.

Possible troubleshooting methods for QuickBooks Error 31600

Solution 1: Verify user settings

  • Open QuickBooks Desktop.
  • Then, click on the “Company”
  • Provide the correct username and password.
  • Once you’ve provided your credentials, navigate to the Users section under Your company settings.
  • Choose the option to Set up Users from the available list.
  • Select “Add users.”
  • Enter the required user credentials.
  • Click Next.
  • Customize the user accounts as needed.
  • After that, hit Finish.
  • Use the new login information to sign in to your account and access your company file.

Solution 2: Create a new admin account

  • Click the Start button.
  • Advance to Settings.
  • Select Accounts.
  • After that, choose Family and other users.

  • From the list of Other Users, select Add someone else to the PC.
  • Choose “I don’t have this sign-in information” and then “Add a user.”
  • Enter a name for the new user.
  • Click Done.

Solution 3: Adjust Windows Server settings

  • Open the Service Manager.
  • Now, click on Computer Management.

  • Expand Local Groups and Users.
  • Double-click on the “Administrator”
  • Click the Add button.
  • Choose the number of users you wish to add under Computer.
  • Select Group Window or Service Account.
  • Enter the account type to be used with the local administrator groups.
  • Click OK when finished.

Solution 4: Perform a browser check

  • Ensure that you have the latest version of your browser installed.
  • Open your browser’s settings and clear the cache and search history.
  • In most browsers, this can be done by pressing Ctrl + Shift + Delete simultaneously. Ensure that all relevant options are selected and then click “remove.”
  • Adjust the timing to “beginning of time” for Google Chrome or choose “all” for Firefox.
  • Close the browser and sign in again.


You may also read: How To Troubleshoot QuickBooks Error Code 1406?


If you require hassle-free resolution of all your QuickBooks issues, our experts are here to assist you. Simply reach out to our QuickBooks professionals via the helpline 1-800-761-1787 to get professional help in resolving QuickBooks Error 31600 and other technical errors in QuickBooks.

QuickBooks Error 17337 – Multiple Avenues for Troubleshooting the Error

QuickBooks users sometimes encounter error code 17337 when attempting to upgrade their payroll service. This error is commonly caused by incorrect Internet Explorer settings or faulty SSL settings that are not properly configured for secure websites. In this article, we will explore the causes of QuickBooks error code 17337 and provide effective methods to resolve it.

Causes of QuickBooks Error 17337:

The following factors can trigger the QuickBooks Error 17337:

  • E browser may not be in sync with QuickBooks.
  • The SSL settings may be incorrectly set up.
  • Firewall may be causing technical hindrance when QuickBooks attempts to connect to the server.
  • The settings in the Internet Explorer may be wrongly set up.

Methods to Fix QuickBooks Payroll Error 17337

Method 1: Adjusting the SSL Settings

  • Run QuickBooks.
  • Make a move to the “Help”
  • Go to “Internet Connection Setup.”
  • Opt for the Internet Connection and following that, click on “Next.”
  • Hit on the “Advanced Connection Settings” and after that, head to the “Advanced”
  • Check mark “SSL 2.0” and “SSL 3.0.”

  • Hit on “Apply”.
  • Follow up by clicking on “Ok”.

Method 2: Use the I.E to adjust the SSL Settings

  • Run the Internet Explorer browser.
  • Now, click on “Tools”.
  • Thereafter, tap on “Internet Options.”
  • Follow up to the “Advanced”

  • Make a way to the “Security”
  • Here, you are required to click on the check boxes to “Use SSL 2.0″ and “SSL 3.0.”
  • Upon doing that, hit on “Apply”.
  • Finally, click on “OK.”

Method 3: Add up QuickBooks program in the Firewall

  • Go to the “Start”
  • Search for “Windows Firewall” and open the “Advanced Settings” of the Firewall.
  • Click on “Inbound Rules.”
  • Make way to the “New Rule” and after that, click on “Program.”

  • Hit on “This Program Path” and after that, opt for the QuickBooks .exe file.
  • Now, allow the connection for this file.
  • Save the rule as “QBFirewallException.”
  • Proceed with the same steps for “Outbound Rules.”

Method 4: Using QuickBooks File Doctor Tool

  • Download the QuickBooks File Doctor from the official website.
  • Run the QuickBooks File Doctor and browse for the Company File.
  • Choose the “Check File Damage Only” option and provide the Admin Password.
  • Follow the instructions displayed on your screen.
  • Restart your computer.


You may also read: How To Fix QuickBooks Payroll Update Error 15102?


By following the methods outlined above, users can resolve QuickBooks Error 17337 when downloading payroll. If the issue persists, it is recommended to contact our QuickBooks experts via helpline 1 800 761 1787. Our dedicated customer support team is available 24/7 to provide effective solutions to your QuickBooks problems.