How to Quickly Fix 100% Disk Space Usage Error (7 Easy Ways)

In Windows 10, many users have registered the complaint that the space used remains at 100% even after they deleted or transferred the data to any external drive. This problem is common when you have upgraded your OS to Windows 10 from any previous version of Windows, but this problem can be seen in any operating system. If you wish to fix this error, then you can follow these methods:

How to Quickly Fix 100% Disk Space Usage Error (7 Easy Ways)

  1. Disable the Services of Superfetch and Prefetch

Prefetch and Superfectch are that services that determine which app or software you will open. As per the statics based on your previous working pattern, it will use the memory to get ready for your PC for that software or app. So that you can have a better and smooth experience. As it helps to improve the experience, it can also take a large amount of the hard disk space. This high disk space usage can be resolved by disabling these services.

Disabling the Superfetch Service

  • Launch the Start menu.
  • In the search bar, enter services.msc and search it, the Services window will open.
  • Now find the Surperfetch in the list of services.
  • Once you find it, tap-right on it, and select Properties.
  • Tap on Disable, then click on the OK button.
  • Now you have to reboot the PC. When the PC restart, check whether the usage of the Disk is reduced or not. If the disk usage is not reduced, then you should disable the Prefetch services too.

Disabling the Prefetch

  • Launch the Start Menu.
  • Search for regedit from the search bar.
  • The Registry Editor will open.
  • Now you have to navigate to HKEY_LOCAL_MACHINE\SYSTEM\CurrentControlSet\Control\SessionManager\Memory Management\PrefetchParameters
  • Find the Enable Prefetch and double click on it. Now, you can see the numbers in the Value Data Box, which configure the Enable Prefetch. The values refer to setting as following;
    0 signifies the disabled Prefetch.
    1 signifies Prefetch is enabled for Applications.
    2 signifies the Prefetch services are enabled for the Boot files.
    3 signifies the Prefetch services are enabled for both Application and Boot files.
  • When you first see the Value data box, three is set as the default.
  • Now change that number to 0
  • Reboot your PC.

These two services generally take the most of the memory usage in the CPU, and disabling these two services can help you a lot.

If still, your issue is not resolved, then you can use the other methods to resolve the issue.

  • Switch off the Windows Search

This method is a beneficial method to reduce memory usage. You should follow these steps to apply this method:

  • Launch the Command Prompt when you run it to ensure you Run as Administrator.
  • Type net.exe stop “Windows search” and run it.
  • When the process is completed, launch the Task Manager. Here, you have to check whether the memory usage is reduced or not.

If this does the work, then you should permanently stop this function otherwise don’t go for this step:

  • Launch the Start menu.
  • Search for Services.msc, and it will open the Services
  • Search here for the Windows Search Services manually.
  • Tap-right on it, then select the Properties.
  • Go for the option Startup type under the tab General.
  • Now, disable it and click on Apply to save the changes.
  • Check The Disk for Issue

If there is some problem with the Disk itself, then the technique, as mentioned above, will not be able to resolve the issue. So you should check the Disk too.

  • Launch Run.
  • Type the Command CMD, which will open Command Prompt, and it will run as administrator.
  • Enter the command CHDSK /R and run it.
  • Now, you have to wait till the PC run this Command and check for the issue in the Disk.
  • Once it shows the problem, then go to Task Manager to resolve it.

If it shows no problem, then go for the next method.

  • CleanUp the Disk

This method is a quick fix technique where you can not ensure that doing this will resolve the issue, but it has chances to resolve the issue. You have to follow these steps if you wish to follow this step:

  • Go to the Start Menu.
  • Search for Disk Cleanup. Open the tool with the same name.
  • Choose the Disk whose system data you wish to remove. The computer will show more options to free the space, and if you want to clean that too then, you can choose from those options too.
  • Now, you have to click on Clean Up System Files, which will start the process.
  • Keep the PC Updated

If you are facing issues in your PC, then this can be the golden rule for you. This step can resolve any upcoming issues automatically, because of the technical team at Microsoft, which is constantly removing the bug in the Operating system and the other Microsoft apps. You can set it for the automatic mode too.

  • Launch Control panel.
  • Go to System and Security.
  • Tap on Windows Update.
  • Now, click on Check for Updates.
  • If there is, then install them.
  • Set the Virtual Memory to Default

If the other methods fail you, then you should reset the virtual memory to the default setting.

  • Launch Control Panel
  • Search for the Advanced System, now open the Advanced System Setting.
  • Now you have to reach out to Advanced Tab.
  • Go to setting in the Performace section.
  • Open Advanced Tab.
  • Now, click on Change in the Virtual Memory section.
  • Now you have to uncheck the box of Automatically Manage Paging File Size for All Drives.
  • Choose the option where is the operating system is installed.
  • Now, you have to provide a range of Virtual Memory.
  • Save these new rules.
  • Clean Boot the PC

This method should be applied as the last option. Applying this step will boot your OS with the minimum and most necessary group of the programs. If you wish to go for this step, then you have to follow these steps:

  • Launch Start.
  • Search for the msconfig.
  • Go to System Configuration.
  • Open the Service Tab.
  • Click on the Hide All Microsoft Services to check the box.
  • Now tap of the button Disable All button.
  • Now, follow the Startup tab in the Task Manager.
  • Select all startup apps and items.
  • Click on Disable.
  • Close every app and windows.
  • Reboot your PC.

These methods will resolve the issue for sure when the system reboots, and then you can see this from the task manager.

James Robert is a creative person who has been writing blogs and articles about cybersecurity. She writes about the latest updates regarding mcafee.com/activate and how it can improve the work experience of users. Her articles have been published in many popular e-magazines, blogs, and websites

Source – How to Quickly Fix 100% Disk Space Usage Error (7 Easy Ways)

Destiny 2: Season of Worthy New Gears and Armors

Destiny 2 has released a new season recently, and it introduces is many fashionable armors. Destiny 2 Season 2 is going to start on 10 March. This season contains a lot of new objects along with the three fancy armor sets. Two of them are base, and one of them is an ornament, and every single armor will be achieved at different activities. After getting the shield of the stellar, we should assume that we are in a treat as per the design and functionality of the armor.

Destiny 2

Introduction: Seasonal Armor

This armor is primary in the Season of the Worthly. Seventh Seraph arena starts from the moderate dark, matte, and dull getup. It seems that this appears from the adjacent activity of Rasputin as it is in the Seraph Bunkers and Seraph Tower.

The other way to get the armor is by buying the season battle pass, after which you can have this full armor as a gift along with every class of objects of Seventh Seraph.

After you get the season pass, then you can unlock the ornaments of this arena, and you will get the Russian themed in the arena. It will feel like you are in the golden age of Cosmodrome. You should know that these ornaments resemble the appearance of military-grade outfits and weapons such as the helmet, Warlock collar, and Titan belt. You should be excited to know there is going to be a different shade of than usual once.

Osiris Armor of Trials

This armor will release on 13 March under the name of Trial of Osiris and will be available every weekend to give the chance to win. It is the Egyptian-themed armor, like in the original game, with some minor changes. When we consider the looks and the uniqueness of this armor, then it tops the charts from the Titan Ra-Helm to hunter scrab. The turquoise and gold paint you can have the not that much of impact. This armor allows you to add more designs and patterns and object to make improvements in the armor in the appearance and functions both to make the armor flawless. This armor and ornament are not as more substantial as the other armors such as Leviathan armor, but it works just fine.

Guardian Games

As mentioned on the calendar of the game, the release of the arena Guardian Games will take place on 21 April, and it will go on the run by 11 May. Between this period, players will get to know about the new and awesome weapons along with one legendary armor available in this arena and had the opportunity to earn this legendary armor.

There are no announcements regarding this armor from the Bungie. There are chances that there are much more than just armor, then you have to wait until Bungie releases anything about this armor and other aspects of this chest (which contains the armor) and this arena of Season 2.

Jay Cross is a trained office.com/setup expert who works with the development team with feedback from customers to make it to expectations. He lives in New York and In addition to his work, he also writes for his personal blog.

Source – Destiny 2: Season of Worthy New Gears and Armors

FaceBook’s New AI-Powered Moderation Tool Helps Identify Fake Accounts

Facebook has introduced a new tool called Deep Entity Classification to combat the creation of fake accounts on the pages of the social media giant. The new device, DEC powered by artificial intelligence, has been designed to counter the steps of cyber thieves and other suspicious people who often create a fake account for stealing the information of other people. Data Entity Classification, along with taking into account the activities of the suspect account, also evaluates all the news of the surrounding. The new artificial intelligence-enabled tool looks into all the pages of the suspect account to which it has interacted, including the behavior of the suspect account.

Facebook

According to Facebook, the new toll has effectively reduced the estimated volume of the fake accounts by at least 27% and has helped to thwart the fake accounts, which were more than 6.5 billion. The malicious and mischievous actors created the fake accounts in such large numbers, and a large number of fake accounts were identified and caught in the initial phase of their creation. Still, the number of fake accounts is much more significant, and according to an estimation by Facebook, it is all about 5% of 2.89 billion accounts. These monthly active users are considered to be the fake account holders on the Facebook page as they have violated the terms of service of the social media giant. It is quite apparent that such counterfeit accounts have been created by malicious people to steal sensitive personal information of Facebook users. Later, such information related to the financial sector or own identity is misused by the cyber thieves to commit malicious activities that could harm the people financially, too, in some other way.

In such circumstances, Data Entity Classification plays an essential role by analyzing the behavior of the user through a holistic and sophisticated approach. It takes for the tool to explain all about features of 20,000 features per profile. Moreover, the artificial intelligence-powered device will also probe into the account of the users, which may be a potential fake account when it tries to send a friend request to someone. Facebook has said that over time, the behavior of the suspicious account holders has also been changed, and they are getting smarter every day to entice the people by pretending to be the real users. The automated system of Facebook has taken into notice of such behaviors. Further, the new tool will also get the advantage by looking in more depth into the action of accounts interacting on the platform.

The introduction and use of such an artificial intelligence-powered toll become vital for the social media giant as the 2020 US presidential elections are approaching. The company has already reported many foreign operations from Russia, Iran, and some other parts of the world, influencing the voting behavior, integral matters of the elections, and news narratives through fake accounts. Facebook and Twitter have faced many such issues of creating fake accounts and influencing the voting behavior and other matters and had to shut down a network of such fake accounts.

James Robert is a creative person who has been writing blogs and articles about cybersecurity. She writes about the latest updates regarding mcafee.com/activate and how it can improve the work experience of users. Her articles have been published in many popular e-magazines, blogs, and websites.

Source –  FaceBook’s New AI-Powered Moderation Tool

How to Fix Waiting for Proxy Tunnel Issue in Chrome

Google Chrome is one of the most used browsers across the world, and it works very efficiently to provide various information that you wish to attain. Chrome comes with numerous features to make your browsing experience highly rich.

Chrome

During the process of browsing, users face various issues such as browser fails to load a site, 401 error code, etc. One such annoying error is Chrome Waiting for Proxy Tunnel, and this issue is solely associated with Google Chrome. Sometimes, this issue appears in another error alert “There Is Something Wrong with the Proxy Server on Windows 10.” There are some necessary troubleshooting steps that you should follow to fix the issue if you are facing such issues on your device:

Waiting for Proxy Tunnel Windows 10 Issues

Web browsers are those platforms by which we launch our preferred website for various purposes. Google Chrome serves us with multiple features for our enhanced accessibility and comfortable web-browsing experience.

Sometimes, users receive various issues on Chrome while browsing a site. “Waiting for Proxy Tunnel” is one of them that tend the site to crash on launch.  It’s one of the very frustrating issues that occur on Windows 10 when we try to load or reload a particular website on Google Chrome. It can arise on any of the available web launchers, but it usually arises on the Chrome browser. There are various reasons behind the issue, such as poor network connection. Internet not working properly, corrupted, or infected web launcher, web URL is not authenticated by Google, the browser gets outdated and needs to update.

Checking Issue for Chrome Browser

It is recommended to check that the issue is directly related to the Google Chrome browser and limited to the same browser. To do the same, follow these points:

  • In the beginning, start the Google Chrome browser and make sure that the site fails to load.
  • Then, launch a secondary browser other than Google Chrome. Now, try to open the same web portal that you have done on Chrome. If you find no issue with it, then it means that the issue is only associated with Google Chrome. It means you have to investigate the actual reason for Chrome.
  • Launch Incognito mode on your window and investigate the issue that it is still arising or not.
  • Next, remove all of Chrome’s browsing data and then look for any unusual actions and occurrences.

Fixing Proxy Tunnel Error Issue on Windows 10

Before proceeding further, it is recommended to check your internet connection that is working properly or not. Abide by these offered instructions to know how to troubleshoot web browser failure issues on your system.

Once you have investigated completely, that the main issue rests only with Google Chrome, and then continue to read these points to fix the issue.

  • First and foremost, open Google Chrome on your desktop and then tap on the Menu icon there. It appears as a three-dotted symbol located at the uppermost right-hand side edge just beside the Address bar.
  • After that, tap on the pull-down menu and hit the “Settings” option.
  • Now, you will be prompted to a fresh window containing various setup options.
  • Next, in the upcoming tab, scroll your page downward and navigate to the lowermost section of your page.
  • Look for the “Advanced” option and tap on it to open its features and other options.
  • Next, hit the System tab situated at the opened section of your page. It will be placed at just somewhere around the lowermost portion of the window screen above the Reset segment.
  • Tap on the “Open Proxy Settings” tab.
  • Now, you will see a prompt box containing options related to the Internet and its properties under the section “Internet Properties.”
  • Then, select the option “Connections.” Usually, this option expands on its own as a default way.
  • After that, tap on the “LAN Settings” button by navigating the bottom section of your screen.
  • Next, unmark the “Automatically detect settings” option, followed by the “OK” tab.
  • Now, return to the previous screen and then hit the “Apply” tab there.
  • Then, press the “OK” button.

James Robert is a creative person who has been writing blogs and articles about cybersecurity. She writes about the latest updates regarding mcafee.com/activate and how it can improve the work experience of users. Her articles have been published in many popular e-magazines, blogs, and websites.

Source – Fix Waiting for Proxy Tunnel Issue in Chrome

How to Fix ShellExecuteEx Failed Error on Windows 10

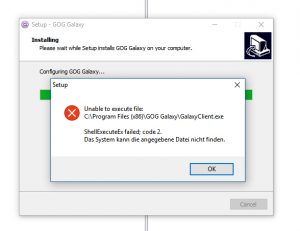
“ShellExecuteEx” is a function of Operating System runs on Windows 10 to execute a particular file for program installation. If the program installer asks for administrative access and the setup fails due to malfunctioned or it is corrupted, then the users find “ShellExecuteEx failed” error on their system. This error alert usually comes with a particular error code. The associating errors codes might be 2, 5, 67, 255, 1155, 8235, 1460, 2147221003 and much more. There are various other reasons those results in the occurrence of this error such as outdated or corrupted drivers, damaged wires and harmful malware etc.

Windows 10

The “ShellExecuteEx” error usually occurs when we try to install a particular application or program on Windows 10. The complete and authenticated setup data is mandatory for installing a file on your device. When these data get corrupts or infected by a virus, your system flashes installation failure errors on the device screen.

Abide by these offered instructions for troubleshooting “ShellExecuteEx failed” issue on Windows 10:

Run the Program with Administrative Access

If you run a program with admin rights, then it executes with its boot section that holds more power. The program running on admin access works very smoothly as compared to a normal one. This method and if the system denies to launch your program, then retry again and again to get the application accessed with admin control.

If you don’t know the process, then read these points carefully:

  • First and foremost, apply the right mouse click on the installer file.
  • Then, hit the tab “Run as Administrator.”
  • After a while, your preferred program will expand on your system with admin controls.

Re-downloading your Installer and Install the Program

Corrupted and outdated program installer may lead you in the problem. So it is recommended to keep the installer up to date for the smooth installation of every program. Corrupted installer prevents the installation setup from directing and executing. In this case, it is advised to download the installer again on your system.

After that, try to install your preferred application on your system for a smooth setup process.

Running SFC Scan on Windows 10

Running SFC detection feature scans for corrupted files and damaged system directory. It scans and tries to remove the issue if any. SFC is useful for corrupted system files. If your system holds corrupted or malfunctioned system files, then try these instructions for running SFC scanning tool:

  • In the start, tap Window and X keys simultaneously to launch “Quick Access Menu” on your system screen.
  • Then, hit the option “Windows PowerShell (Admin).” In case the system displays Command Prompt option in place of PowerShell, then hit the same to launch.
  • Next, perform the command line: “SFC/ scannow.”
  • After that, press enters key to proceed.
  • Wait for some moments for the scanning process to complete.
  • In case you received a confirmation message, then it’s good. If you find corrupted data is unable to fix, then it is recommended to reboot your device under safe mode.
  • After that, try to run SFC scanning once more.

Resetting System Sounds Feature to Default

  • First and foremost, hit Window icon and the R key at one go. It will launch the Run dialogue box.
  • Next, enter the keywords: mmsys.Cpl proceeded by entering tab.
  • Now, hit the Sounds tab there. Choose Windows Default option located under “Sound Scheme.”
  • Press the Apply tab.
  • Then, hit the enter key.

Installing or Running Program under Clean Booting Mode

If all the above steps become useless, then, try to run your application under clean boot mode. It helps you to fix various issues related to corrupted driver, outdated and infected system files and much more. If you use a clean boot feature. Your device executes under the clean boot and thus provides you with a safe environment for installing a program. It is recommended to follow the appropriated procedure to do the same.

James Robert is a creative person who has been writing blogs and articles about cybersecurity. She writes about the latest updates regarding mcafee.com/activate and how it can improve the work experience of users. Her articles have been published in many popular e-magazines, blogs, and websites.

Source –  Fix ShellExecuteEx Failed Error on Windows 10