Why is my Epson Printer Not Printing Black When ink is full

Printing errors are common in all kinds of printers. If you are an Epson printer user, you might have also faced the ” Epson printer not printing” issue. In this issue, your Epson printer does not print what you command it to print from your connected devices. As a result, you get no or blank prints from your Epson printer. There could be many factors responsible for this issue. That is why we have specified each & every reason responsible for the “Epson printer not printing” issue along with their solutions below. Have a look at them.

Epson Printer Not Printing Error- Fix

Sometimes, small issues in your Epson printer does not allow it to print anything. That is why it is advised to run a small printer check before troubleshooting the “Epson printer not printing black after refill” problem.

  • Firstly, you have to check if your Epson printer is turned on.
  • Now, ensure if your Epson printer is properly connected to the computer through the USB cable.
  • You have to also verify if you have placed the ink cartridge correctly.
  • Now, you have to check if you have properly inserted the printing papers into the printer’s tray.
  • Check your Epson printer for error signals.
  • Clean Your Epson Printer’s Printhead

If you don’t clean the printhead of your Epson printer properly. Then, it could give rise to the “Epson printer not printing” problem. When you don’t use your printer for a long time, its printhead gets clogged with ink and air. That is why you should print regularly from your Epson printer & clean its printhead. Each printer has an in-built cleaning tool for the printhead, That is why you don’t have to worry about this

Clean the Epson printer’s printhead From Windows Computer

  • Clean out the Printhead of your Epson printer.
  • Place the printing paper in your Epson printer’s tray.
  • Open up the control panel of your Windows computer’s search located at its taskbar.
  • Now, You will need to choose the “Printers and Tablets” option by clicking on it.
  • Pick Computer & printer from the “Objects control panel” in Windows 10.
  • Now, you have to Right-Click on your Epson printer and select the Print option from the Options menu.
  • After that, Right-click on your non-printing Epson printer and click on the printing preferences option.
  • At that point, you can simply click on the tab “Manage icon”.
  • Now, you will see the “Epson Printer Preferences Maintenance” page, click on it.
  • Under Epson Printer Repair, press on the “Head Cleaning” option.
  • Now, simply push down the “Start” button.
  • To repair the “Epson printer not printing” issue, you have to press the “Start” option for the Head Cleaning.
  • Lastly, Follow the On-Screen instructions to complete it.

Choose your Epson Printer as the Default Printer of your computer

  • On your Windows 10 computer, click on the “Start” button & choose its Settings.
  • Tap on the “Printer & Scanners” choice you see there.
  • Now, you have to go to the “Devices” option and select “printers and scanners”.
  • After that, click on the “Select your Epson Printer” from the Printer’s list, and then click on the “Manage” button.
  • Lastly, you will have to just click on the “Set as Default” button to complete this process.

Note: Uncheck the option if you haven’t seen the “Set As Default option”.

You have now configured the Epson printer as your computer’s default printer. Try printing a paper now. You should patch an Epson non-printing printer error on your PC

Re-install your Epson printer

When you install your Epson printer incorrectly, It stops working in the desired way. As result, it starts to give you the “Epson printer not printing” error. If you see that error, Then you can re-install the Epson printer on your computer to fix this issue.

  • Visit the “Program And Features” option by clicking on it under the Control Panel of your computer.
  • Uninstall your Epson printer by right-clicking on it.
  • Turn off your PC and printer now.
  • Disconnect your Epson printer from the computer device.
  • Restart your computer & Epson printer at the same time.
  • Connect your Epson Printer to the computer
  • On your computer, proceed to “reinstall” the Epson Printer.

Update the Drivers of your Epson Printer

Many times, your Epson printer doesn’t print because it does not have “updated printer drivers”. It results in your Epson printer, not printing. If you update your Epson printer drivers. Then, it will remove the printing error from it and your printer will start to print.

  • Open the “Start Menu” of your computer by clicking on it.
  • In the search box, search for the “Device Manager” option and press the “Enter” button.
  • Now, Right-Click on the “Printer” option you see there in the list of devices & components.
  • Under System Manager, press Update driver to repair the Epson printer, not printing issue.
  • Then press on the “Auto Search” option for getting modified driver Apps.
  • Now, Click on the “Check for modified driver software” automatically to upgrade the Epson printer’s
    driver on your Windows 10 computer.
  • Follow Directions available On-Screen.

Epson Printer Not Printing Black

Problematic printer cartridge & printhead is the main reason responsible behind the “Epson printer not printing black” issue. You should follow the below-mentioned steps to fix this issue.

  • Firstly, Open your Epson printer’s panel & insert the printer cartridge correctly after taking it out from its place.
  • Secondly, Make sure your Epson printer has sufficient black ink levels by checking its ink status.
  • Sometimes, the Printer cartridge clogs down because of ink flow. In that case, you should clean the Clodges from it using a pin or something else.
  • You can fix the “Epson printer not printing black” ink issue by cleaning its printhead using the distilled water, and sponges.
  • The printhead of the printer can also be cleaned by running a cleaning cycle on your printer.
  • In that case, you can also turn off your Epson printer and leave it for at least 15 minutes on rest.
  • Using a clean & dry towel, wipe the printhead with it and slide it to its original place.
  • Always use genuine cartridges and printing sheets that are compatible with your Epson printer.

If your Epson printer is not printing colors, or black ink properly, despite of performing all of the troubleshooting steps mentioned above.

How  to Download Epson Printer Drivers for Windows 11, 10, 8 and 7

In this passage, you can know the details about the top ways to download the latest Epson printer drivers to make it better connected to WIFI.

People now can download and update Epson printer drivers freely from the Epson official site, if you tend to download Epson wireless printer drivers on your own, you can navigate to the Epson Website.

You can enter the Epson Homepage from Epson Center.

1: Click Support. It is on the top of the Epson homepage.

epson support center

2: Type product name or product number in “Find your model” and then click Search.

Here, you can type Epson printer name or number, such as Epson printer WorkForceWF-2650DWF.

search epson wf2650 printer

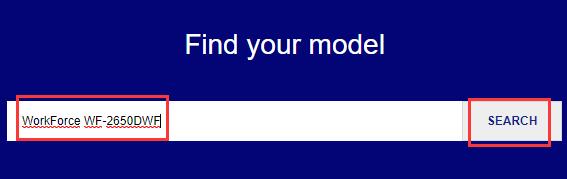
Note: But it is possible that after you typed your Epson printer model or number in the search box, it pops up a drop-down menu that contains many different models of  your the Epson printer series, at this moment, you need to choose the exact Epson printer model which matches with your Epson All-in –one or Label printer.

3: Choose the Windows system type.

The Epson Support center will automatically recognize the OS type for you, but you can also select depending on your likings, such as Windows 10, Windows 7 or 8 or Linux. And then it will find drivers, manuals, and software for your Epson Large Format printer or POS printer.

Here choose Windows 10 64-bit. Sometimes, you may need to scroll down the down-down list to find out the OS type.

                                                   epson printer windows type


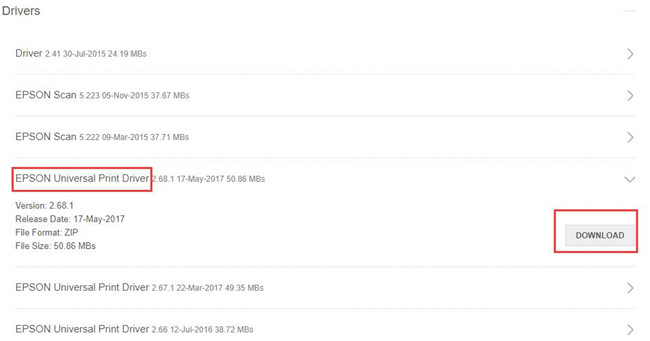
4: Expand Drivers and click the Epson printer drivers which you want to download for Windows 10.

Here download Epson Universal Print Driver 2.68.

download epson printer driver


5: Install the Epson printer drivers.

Note: If it available for your Epson printers to download Epson printer setup, you can download it for that it can help you download and install the latest software and drivers including Epson printer drivers network drivers, scanner drivers, etc.

If it is available, you would better Epson printer driver download for windows 10 and  setup, it will be very convenient.

It is a way offered for you to download the Epson Impact printer drivers from the Epson official site. You can use it to update the Epson Dot matrix printer drivers for Windows 10 as well.

Linksys Wifi Extender Setup – Manual and WPS Methods

In this article, you will look at setting up your Linksys range extender to improve your home network’s strength and range. Having a good Wi-Fi network allows you to connect your multiple end devices to the network.

Linksys wifi extender setup without ethernet cable is one of the best effective Wi-Fi tweaks you can do to enhance your network range. Before you proceed with the Linksys extender setup , you should know where to place your extender for maximum effect. You should place the extender in the center area of your home, where you need a stronger WiFi connection.

Linksys WiFi Extender Setup – Easy and Quick Process

  • Start by establishing a wired connection between the devices, which includes your router, client device, and extender.
  • Next, turn on the Linksys extender by connecting it to a power source.
  • The extender’s power LED will glow a solid green light after it is turned on.
  • Now, connect a networking device, such as a PC, to your Linksys Extender Setup network.
  • Open a web browser on the linked PC and type https://extender.linksys.com into the address bar.
  • If the default gateway fails to provide access to the Linksys extender login page, you can utilize the extender’s default IP.
  • When prompted, type the default username and password into the fields provided.
  • It will take you to the Linksys extender setup  page.
  • Now, follow the Linksys extender setup wizard instructions by clicking the Quick setup tab.
  • Your extender will begin scanning for available networks automatically.
  • Choose the network name you want to expand from a list of networks and input the Wi-Fi password.
  • After that, you’ll be prompted to change your network name and password. Set a strong and complex password for the SSID of your extension.

If you get an error during setup and configuration, perform the Linksys wifi extender reset process. For more information on the same, dial our toll-free number.

Linksys extender setup without computer

Your range extender comes with the WPS push button. WPS is a Wi-Fi security standard that allows you to establish steady connections between the extender and your end devices. WiFi Protected Setup is the quickest way to install and set up your extender.

To do the Linksys extender setup, you can use the WPS button located on the extender’s back panel. Learn how to use a WPS button to connect to the network.

  • Firstly, plug in the Linksys extender to the electrical source and turn it on.
  • Now, locate and press the WPS button on the extender.
  • Next, head over to your home router and press the WPS button.
  • Check the status of the LED light on the Linksys extender and your router.
  • A white LED light will indicate your Linksys extender is connected to the router.
  • Afterward, your range extender will automatically clone the network settings from your home router.
  • Now, unplug the Linksys device and place it halfway between your router and the dead spot.
  • If the LED light doesn’t blink white, move your extender closer to the router.

We hope you have understood the process of Linksys wifi extender setup from here. If you still need any kind of help or assistance in the cause our team of technical experts is here for the help.

Use the web-based WPS button to set up your Linksys wifi extender

In this method, you will use either a WPS button, WPS PIN, or your router’s PIN to set up your range extender.

a) WPS button

First, visit the extender.linksys.com login page. Log in to your extender settings. Click on Wireless and then select the WPS option. Now, press the WPS button on your device to start the setup process. Then click on Enable next to the WPS button.

b) WPS PIN

If your home router includes a WPS pin, then enter the pin in the given field on the Linksys wifi extender setup page.

c) Router PIN

Also, if your client device asks for the router’s PIN, then enter that pin in the third field on the given page. Now, check the status of the WPS light. If it is continuously lit, the extender setup has been completed.

If you face any issues while setting up the extender, contact the technical experts on the helpline number. They will provide you some troubleshooting tips to fix the extender setup and login issues.

All information about how to setup Linksys extender has been discussed in this article. Ensure that all the steps are correctly followed, and your Linksys wifi extender setup re6500 will be completed in no time.

Why Canon Printer not Connecting to Wifi How to Fix

Canon Printer Not Connecting to Wi-Fi – Do you own Canon Printer? Is your device refusing to connect with the wireless network? Well, don’t worry, we got you covered up. Canon is a magnificent brand that delivers tremendous gadgets like printers. The quality and prolonged printing experience offered by these printers has attracted lots of users to invest in Canon. However, even these devices sometimes act wired and refuse to perform up to their capabilities. If you are facing Canon Printer Not Connecting to Wi-Fi issue and you have already spent hours online searching for a quick resolution, then you have finally reached the ultimate platform.

If you are a Canon Printer user, then this blog is for you. A working printer can do wonders for both personal and professional work. But imagine a situation where your Canon Printer Won’t Connect to Wifi and you want to print an important document. Scary isn’t it? If you are facing the same issue and wanted to learn how to fix this issue in no time, then you have reached the perfect place. Our experts have listed few simple methods to fix this issue. We will try to make things easy for you through our guide.

How to Fix Canon Printer Not Connecting to Wi-Fi

Recently we have come across many complaints related to the Canon printers. But one such error that has been reported by many users was printer refuses to connect to the wireless network. It is one of the most common technical issues faced by Canon users with their printers. The reasons may vary depending on the model and kind of printer you are using. To help you with the best resolution, we have listed the full procedure on How to Fix Canon Printer Not Connecting to Wi-Fi:

Method 1: Update Printer Drivers

What is worse than having a printer with incompatible or outdated drivers. Outdated drivers can halt the printer performance and may trigger the Canon Printer Not Connecting to Wi-Fi issue. To fix this issue, it is required to update the drivers of the printer. Here’s how you can do this:

  1. Note down the printer model number and SSID.
  2. Launch Web Browser and go to the Official Canon Website.
  3. Navigate to the Driver section and in the search box, enter your printer model name or number.
  4. Press Search.
  5. Choose the most compatible option and press on Download.
  6. Follow the on-screen instructions to download and install the printer drivers.

You can try out this method to eradicate this irritating issue from its roots. If this method did not resolve the issue, then we suggest you to move on to the next method.

Method 2: Restart Canon Printer and Router

A simple restart can fix minor issues and internal glitches associated with the gadget. Therefore, restarting the device and the router will be a great decision to fix the Canon Printer Not Connecting to Wi-Fi issue. Here’s how you can perform this method:

  1. Initiate the process by turning the Printer Off.
  2. Now unplug wires attached to the printer. Wires such as power cord or USB cables also need to be removed).
  3. Once done, wait for few seconds before moving further.
  4. Re-attach the wires to the device and Restart the Printer.
  5. Restart the router by pressing and holding the Power Button for at least 10 seconds.
  6. Now go to the Wireless Settings and choose the Network Name.
  7. Enter the login credentials and press Connect.

Once done with the steps mentioned above, check the status of the issue to determine whether it has been fixed or not. If not, then you can try out the third method to get rid of the Canon Printer Not Connecting to the Wi-Fi
issue.

Method 3: Look for Printer Errors

This method to fix the Canon Printer Not Connecting to Wi-Fi issue involves carefully checking the Canon printer whether it is showing any error code or not. Ensure that your device is not showing any errors. You can inspect the panel of the Canon printer to check about the Errors, Flashing lights, or error codes. Canon program its printers with the latest technology that enable them to detect and reflect the errors by the way of flashing lights, error codes, etc. The errors generally arise due to the following reasons such as paper jams, sheet stock out, etc. If your device is showing any error code, then try to address that error before moving ahead.

Method 4: Check the Connectivity

Printers especially Canon require strong and reliable internet connectivity to perform up to its capabilities. Therefore, it would be wise to check the internet connectivity first to fix the Canon Printer Not Connecting to Wi-Fi issue. You have to perform the following checks:

  1. Make sure that the router is getting strong signals.
  2. Check the signal strength.
  3. Locate the printer and the router close to each other for better connectivity.
  4. Remove obstacles such as baby monitors, refrigerators, etc. as they may interfere with the signals.
  5. Reset the router (If needed).
  6. Disable windows firewall for a temporary period.

Summing Up

These were some of the easiest and reliable methods on How to Fix the Canon Printer Not Connecting to Wi-Fi. We hope you enjoyed the blog and read the complete literature till the very end How to connect printer to wifi. In case you need more in-detailed technical assistance from experts, then don’t forget to initiate the live chat.

Download and Install Canon Printer Driver By http//ij.start.canon

Cannon is an experienced brand that has a large number of varieties of best-in-class technology. Cannon offers the best-tested products that compile cameras, printers, scanners, lenses, medical equipment, and semiconductor manufacturing equipment. These brands’ (ij.start.cannon) products never disappoint their users and provide the quality each time that makes it worth having. People never take their feet back by considering this the best industry worldwide. The main reason for its popularity is the loyalty with customers that Canon has maintained so far.

Well, here you will be enlightened with amazing Canon Printers; this explicit read will introduce you to the function of http//ij.start.canon. Moreover, you will be familiar with the software download setup, its Installation Steps, the fantastic features, system compatibility, the things of consequence while installing the canon printer drivers, and all the required information to make it run smoothly.

Precise Steps To Download Canon Printer Drivers via ij.start.cannon
In this section of the article, you will get the simple steps to download the Canon Printer Drivers for easy setup of ij.start.cannon. Just follow the illustrative procedure given below to make it run smoothly:
Step1. Go To Official Website Of Canon: Here, you need to take steps towards the official website of ij.start.cannon. You need to open a secured web browser and click on the address bar to start. Now, type ij.start.cannon in the address bar and press the enter tab to proceed further. This step will redirect you to the official homepage of Canon.

Step2. Search Your Product Name: Then, select the setup button, a Product Name window will pop up on your screen. Because Canon has specific software for all the printer models, you need to enter your model number in the search field and then press the “GO” button.

Step3. Confirming The Compatibility Of Driver: In this step, you need to verify if the canon printer driver you are going to download is compatible with your operating system or not. For this, select an OS version placed at the upper-right corner. Lastly, click on the download button in the middle of the screen for an instant download.

Note: Speed of Canon Printer Software installation entirely depends on your Wifi speed. Ensure good network connectivity for quick and fast procedures. Also, it is highly recommended for a hassle-free process not to jump other screens while downloading the software. Once you are done downloading, you can now jump for the ij.start.cannon setup.
Procedure To Install Printer Driver Using ij.start.cannon

Once you have downloaded the canon printer drivers & software, you need to confirm their installation in the system. Here is the complete explanation for installing the printer driver without facing any kind of hassle throughout the process.

  • You need to start by being at your download folder. Now, double click on the Canon Print Driver that you have downloaded in the folder. Then, select “RUN” to quickly access the files.
  • Canon Driver Setup screen will display to you. Here, you have the authority to select the preferred language. Keep in mind that all the further operations of the software will work in the language you will opt for here. Once you choose your convenient language, hit the “NEXT” button to proceed ahead.

    In this step, you have to link your wireless Cannon printer with your system for easy ij.start.cannon uses. You can either choose a USB connector or any wireless connection method. Once you get the notification that you have successfully linked a wireless Cannon printer with your computer, kindly settle on your printer model. This will show you the drivers and other software lists to choose your one.

    Here, kindly enable all the required checkboxes to ensure the necessary space to install the printer drivers in the system. Also, if you are facing space disturbance in the system, Uninstall unnecessary software to make the required space for the canon printer driver. After, hit on the “NEXT” button and go forward to set up the ij.start.cannon

    As mentioned in the tagline, A License agreement window will open on your screen. Carefully read each and every statement shown in the document to prevent future issues. Once you go through the complete reading of the agreement, hit the “Yes” button to prove that you have granted your acceptance. Then, ij.start.cannon will start to install automatically.

    It is highly suggested not to move to another screen until the complete installation. Then, please take a quick test that the driver setup successfully completed by giving it a printable page command. For this, add a few A4-sized sheets on the tray and enforce the task; you definitely will get a clear printout result from the successful setup of the printer driver.

    There is no shortage of printer models in the market, but why can Canon printers used by  ij.start.cannon be the ones you should opt to experience the best. This product has impressive features that make it most worthy and user-friendly. Let’s find out the reasons that will enlighten you with the advantages of having a canon printer driver only all the time:

     IJ Start Canon is an online platform to download and setup all canon model printer driver on windows and mac device.